AI驱动的Web抓取和数据分析
在本指南中,我们将学习如何将网页抓取与人工智能相结合,以构建一个强大的工具,用于免费大规模收集和分析数据。让我们开始吧!

虽然某些网站只需使用 Selenium、Puppeteer 等工具即可轻松抓取,但实施了 CAPTCHA 和 IP 禁令等高级安全措施的其他网站可能会很困难。为了克服这些挑战并确保你可以使用 Scraper 免费抓取 99% 的网站,你将在本文中构建它,在代码中集成一个代理工具,以帮助绕过这些安全措施。
但是,收集数据只是其中一步;你对这些数据的处理同样重要,甚至更重要。通常,这需要手动仔细筛选大量信息。但是,如果你可以自动化这个过程呢?通过利用语言模型 (LLM),你不仅可以收集数据,还可以查询数据以提取有意义的见解——节省时间和精力。
在本指南中,我们将学习如何将网页抓取与人工智能相结合,以构建一个强大的工具,用于免费大规模收集和分析数据。让我们开始吧!
开始之前,请确保你具备以下条件:
- 基本 Python 知识,因为此项目涉及编写和理解 Python 代码。
- 在你的系统上安装 Python(3.7 或更高版本)。你可以从 python.org 下载。
1、安装和设置
要继续本教程,请完成以下步骤:
按照以下步骤设置您的环境并准备构建 AI 驱动的抓取工具。
1.1 创建虚拟环境
首先,设置虚拟环境来管理项目的依赖项。这将确保你拥有一个用于所有必需包的独立空间。
创建新项目目录。打开终端(或 Windows 上的命令提示符/PowerShell)并为您的项目创建一个新目录:
mkdir ai-website-scraper
cd ai-website-scraper
创建虚拟环境。运行以下命令创建虚拟环境。
python3 -m venv venv这将创建一个用于存储虚拟环境的 venv 文件夹。
1.2 激活虚拟环境
激活虚拟环境以开始在其中工作:
source venv/bin/activate你的终端提示符将更改为显示 (venv),确认你现在位于虚拟环境中。
1.3 安装所需的依赖项
现在,安装项目所需的库。在项目目录中创建一个 requirements.txt 文件并添加以下依赖项:
streamlit
selenium
Beautifulsoup4
langchain
langchain-ollama
lxml
html5lib
这些包对于抓取、数据处理和构建 UI 至关重要:
- streamlit:用于创建交互式用户界面。
- Selenium:用于抓取网站内容。
- beautifulsoup4:用于解析和清理 HTML。
- langchain 和 langchain-ollama:用于与 Ollama LLM 集成并处理文本。
- lxml 和 html5lib:用于高级 HTML 解析。
通过运行以下命令安装依赖项。在运行命令之前,请确保你位于文件所在的文件夹中:
pip install -r requirements.txt2、使用 Streamlit 构建 UI
Streamlit 可轻松为 Python 应用程序创建交互式用户界面 (UI)。在本节中,你将构建一个简单、用户友好的界面,用户可以在其中输入 URL 并显示抓取的数据。
2.1 设置 Streamlit 脚本
在项目目录中创建一个名为 ui.py 的文件。此脚本将定义抓取工具的 UI。使用以下代码来构建你的应用程序:
import streamlit as st
import pathlib
from main import scrape_website

# function to load css from the assets folder
def load_css(file_path):
with open(file_path) as f:
st.html(f"<style>{f.read()}</style>")
# Load the external CSS
css_path = pathlib.Path("assets/style.css")
if css_path.exists():
load_css(css_path)
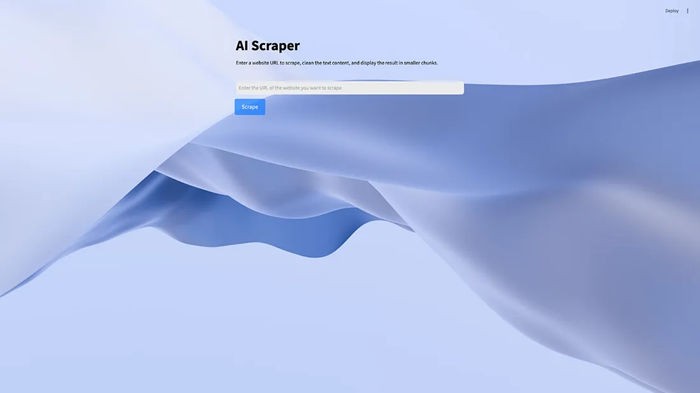
st.title("AI Scraper")
st.markdown(
"Enter a website URL to scrape, clean the text content, and display the result in smaller chunks."
)
url = st.text_input(label= "", placeholder="Enter the URL of the website you want to scrape")
if st.button("Scrape", key="scrape_button"):
st.write("scraping the website…")
result = scrape_website(url)
st.write("Scraping complete.")
st.write(result)- st.title 和 st.markdown 函数设置应用程序标题并为用户提供说明。
- st.text_input 组件允许用户输入他们想要抓取的网站的 URL。
- 单击“Scrape”按钮会触发抓取逻辑,使用 st.info 显示进度消息。
你可以从 streamlit 组件的文档中了解有关其的更多信息。
2.2 添加自定义样式
要设置应用程序的样式,请在项目目录中创建一个 assets 文件夹并添加一个 style.css 文件。使用 CSS 自定义 Streamlit 界面:
.stAppViewContainer {
background-image: url("https://images.unsplash.com/photo-1732979887702-40baea1c1ff6?q=80&w=2832&auto=format&fit=crop&ixlib=rb-4.0.3&ixid=M3wxMjA3fDB8MHxwaG90by1wYWdlfHx8fGVufDB8fHx8fA%3D%3D");
background-size: cover;
color: black;
}
.stAppHeader {
background-color: rgba(0, 0, 0, 0);
}
.st-ae {
background-color: rgba(233, 235, 234, 0.895);
}
.st-emotion-cache-ysk9xe {
color: black;
}
.st.info, .stAlert {
background-color: black;
}
.st-key-scrape_button button {
display: inline-block;
padding: 10px 20px;
font-size: 16px;
color: #fff;
background-color: #007bff;
border: none;
border-radius: 5px;
cursor: pointer;
animation: pulse 2s infinite;
}
.st-key-scrape_button button:hover {
background-color: #0056b3;
color: #fff;
}
2.3 运行 Streamlit 应用
在你的项目目录中,运行以下命令:
streamlit run ui.py这将启动本地服务器,你应该在终端中看到一个 URL,通常是 http://localhost:8501。在浏览器中打开此 URL 以与 Web 应用程序交互。
3、使用 Selenium 抓取网站
接下来,编写代码以使用 Selenium 提取任何网页的 HTML 内容。但是,要使代码正常工作,你需要 Chrome WebDriver。
3.1 为 Selenium 安装 ChromeDriver
Selenium 需要 WebDriver 才能与网页交互。以下是设置方法:
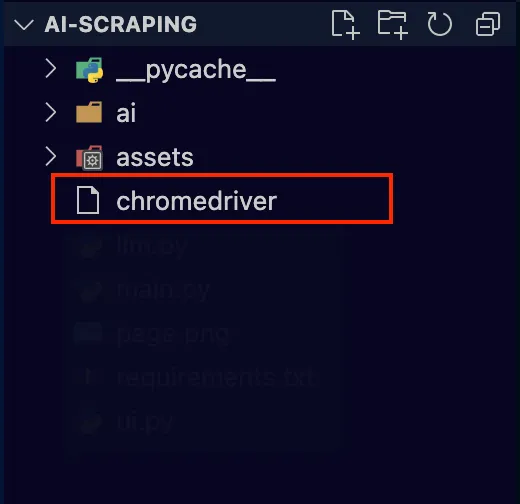
- 下载 ChromeDriver。访问 ChromeDriver 网站并下载与您的 Google Chrome 浏览器匹配的版本。
- 将 ChromeDriver 添加到 PATH。
下载 ChromeDriver 后,解压文件并复制应用程序文件名“chromedriver”并将其粘贴到你的项目文件夹中。
完成后,创建一个名为 main.py 的新文件并执行以下代码:
from selenium import webdriver
from selenium.webdriver.common.by import By
from selenium.webdriver.chrome.service import Service
from selenium.webdriver.support.ui import WebDriverWait
from selenium.webdriver.support import expected_conditions as EC
# Function to scrape HTML from a website
def scrape_website(website_url):
# Path to WebDriver
webdriver_path = "./chromedriver" # Replace with your WebDriver path
service = Service(webdriver_path)
driver = webdriver.Chrome(service=service)
try:
# Open the website
driver.get(website_url)
# Wait for the page to fully load
WebDriverWait(driver, 10).until(EC.presence_of_element_located((By.TAG_NAME, "body")))
# Extract the HTML source
html_content = driver.page_source
return html_content
finally:
# Ensure the browser is closed after scraping
driver.quit()
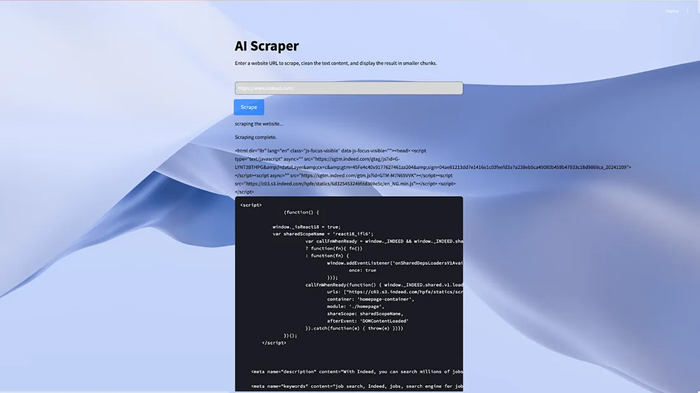
保存并运行代码;你应该会像这样在 streamlit 应用程序中显示抓取的页面的所有 HTML:
4、使用代理提供商绕过验证码和 IP 禁令
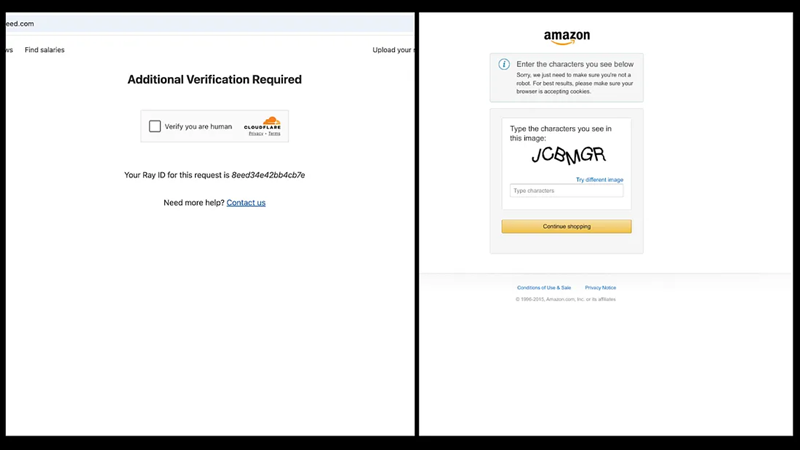
虽然你现在可以检索网站的 HTML,但上述代码可能不适用于具有高级反抓取机制(如验证码挑战或 IP 禁令)的网站。例如,使用 Selenium 抓取 Indeed 或 Amazon 等网站可能会导致验证码页面阻止访问。发生这种情况的原因是网站检测到机器人正在尝试访问其内容。如果这种行为持续存在,该网站最终可能会禁止你的 IP 地址,从而阻止进一步访问。
要解决此问题,请将 Bright Data 的抓取浏览器集成到你的脚本中。抓取浏览器是一款强大的工具,它利用多个代理网络(包括住宅 IP)来绕过反抓取防御。它通过管理自定义标头、浏览器指纹识别、验证码解决等来处理解锁页面。这可确保你的抓取工作在无缝访问内容的同时不被发现。
转到 Bright Data 的主页并单击“开始免费试用”。如果你已经拥有 Bright Data 帐户,则只需登录即可。
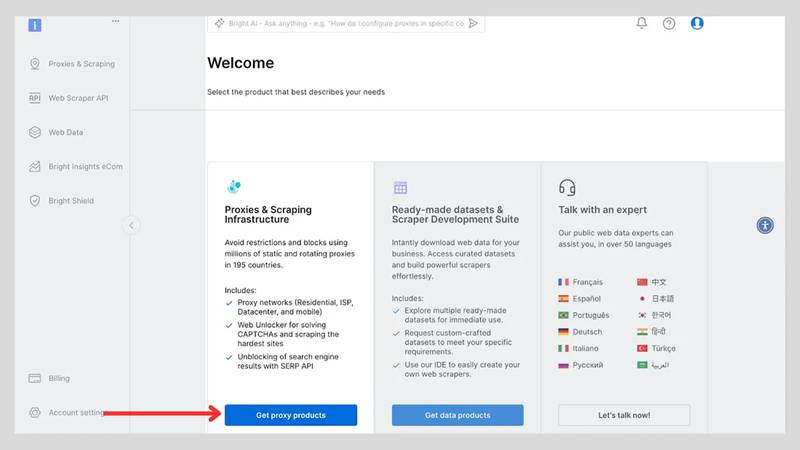
登录后,单击“获取代理产品”。
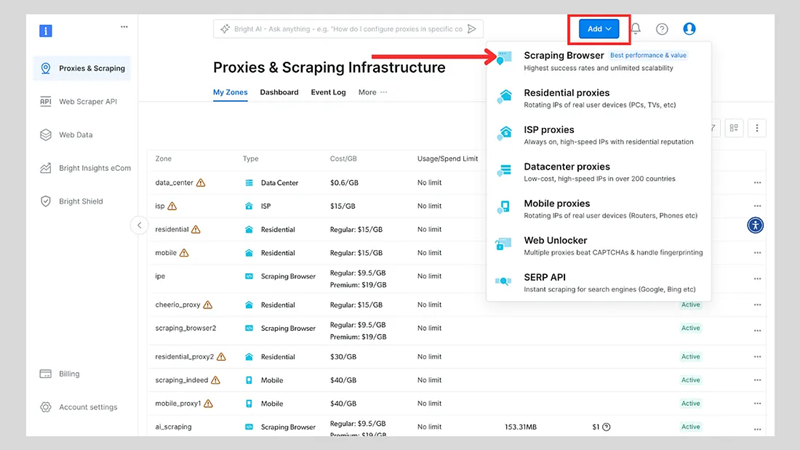
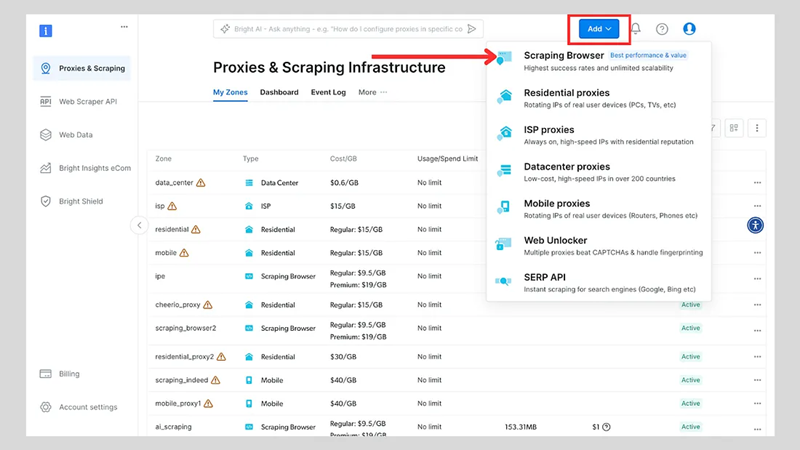
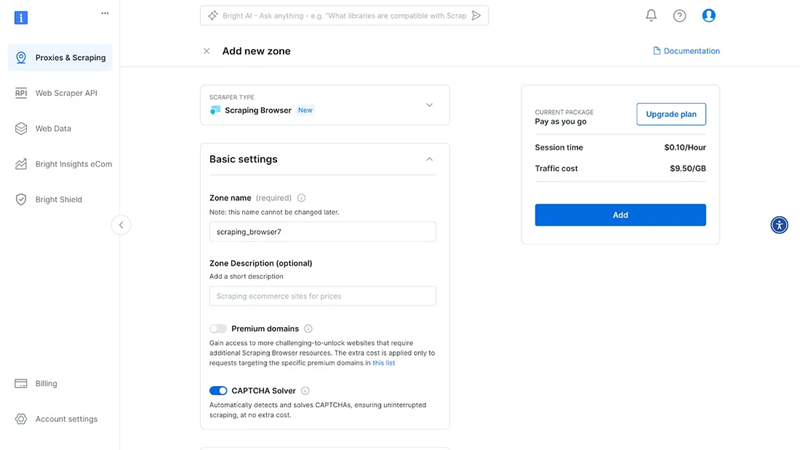
单击“添加”按钮并选择“抓取浏览器”。
接下来,你将进入“添加区域”页面,需要在该页面为新的抓取浏览器代理区域选择一个名称。之后,单击“添加”。
之后,将创建你的代理区域凭据。你将需要脚本中的这些详细信息,以绕过任何网站上使用的任何反抓取机制。
你还可以查看 Bright Data 的开发人员文档,了解有关抓取浏览器的更多详细信息。
在你的 main.py 文件中,修改代码以包含抓取浏览器。你会注意到此代码比以前的代码更简洁、更短。
from selenium.webdriver import Remote, ChromeOptions
from selenium.webdriver.chromium.remote_connection import ChromiumRemoteConnection
from selenium.webdriver.common.by import By
from bs4 import BeautifulSoup
AUTH = '<username>:<passord>'
SBR_WEBDRIVER = f'@brd.superproxy.io:9515'">https://{AUTH}@brd.superproxy.io:9515'
# Function to scrape HTML from a website
def scrape_website(website_url):
print("Connecting to Scraping Browser…")
sbr_connection = ChromiumRemoteConnection(SBR_WEBDRIVER, "goog", "chrome")
with Remote(sbr_connection, options=ChromeOptions()) as driver:
driver.get(website_url)
print("Waiting captcha to solve…")
solve_res = driver.execute(
"executeCdpCommand",
{
"cmd": "Captcha.waitForSolve",
"params": {"detectTimeout": 10000},
},
)
print("Captcha solve status:", solve_res["value"]["status"])
print("Navigated! Scraping page content…")
html = driver.page_source
return html
将 <username> 和 <password> 替换为你的抓取浏览器用户名和密码。
5、清理 DOM 内容
抓取网站的 HTML 内容后,通常会充斥着不必要的元素,例如 JavaScript、CSS 样式或不需要的标签,这些元素对您提取的核心信息没有帮助。为了使数据更加结构化并更有利于进一步处理,您需要通过删除不相关的元素和组织文本来清理 DOM 内容。
本节介绍如何清理 HTML 内容、提取有意义的文本并将其拆分为较小的块以供下游处理。清理过程对于为自然语言处理或内容分析等任务准备数据至关重要。
以下是将添加到 main.py 中以处理清理 DOM 内容的代码:
from bs4 import BeautifulSoup

# Extract the body content from the HTML
def extract_body_content(html_content):
soup = BeautifulSoup(html_content, "html.parser")
body_content = soup.body
if body_content:
return str(body_content)
return ""
# Clean the body content by removing scripts, styles, and other unwanted elements
def clean_body_content(body_content):
soup = BeautifulSoup(body_content, "html.parser")
# Remove <script> and <style> tags
for script_or_style in soup(["script", "style"]):
script_or_style.extract()
# Extract cleaned text with each line separated by a newline
cleaned_content = soup.get_text(separator="\n")
cleaned_content = "\n".join(
line.strip() for line in cleaned_content.splitlines() if line.strip()
)
return cleaned_content
# Split the cleaned content into smaller chunks for processing
def split_dom_content(dom_content, max_length=5000):
return [
dom_content[i : i + max_length] for i in range(0, len(dom_content), max_length)
]
代码的说明:
提取正文内容:
extract_body_content函数使用 BeautifulSoup 解析 HTML 并提取<body>标签的内容。- 如果
<body>标签存在,该函数会将其作为字符串返回。否则,它会返回一个空字符串。
清理内容:
clean_body_content 函数处理提取的内容以删除不必要的元素:
- 删除
<script>和<style>标签以消除 JavaScript 和 CSS。 - 该函数从清理的内容中检索纯文本。
- 它通过删除空行和多余的空格来格式化文本。
拆分内容:
split_dom_content函数获取清理的内容并将其拆分为较小的块,默认最大长度为 5,000 个字符。- 这对于以可管理的片段处理大量文本非常有用,尤其是在将数据传递给具有令牌或输入大小限制的模型时。
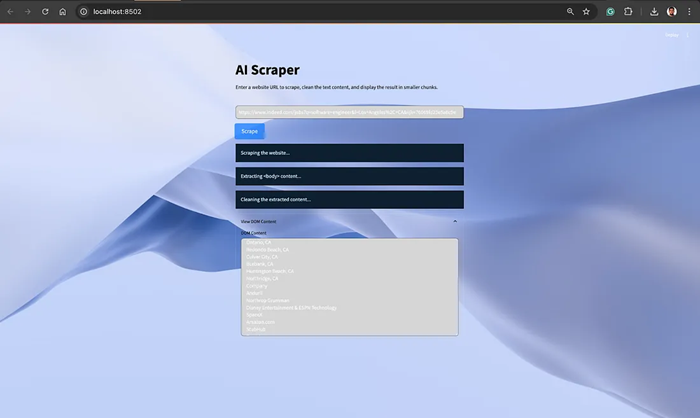
保存更改并测试应用程序。抓取网站后,你应该会得到这样的输出。
6、将 Dom 解析内容发送给 Ollama
清理并准备好 DOM 内容后,下一步是使用与 LangChain 集成的大型语言模型 Ollama 解析信息以提取特定细节。此步骤允许你利用自然语言指令自动从数据中提取有意义的见解。
以下是如何设置使用 Ollama 解析 DOM 内容并将其与 UI 集成的功能。
以下代码实现了使用 Ollama 解析 DOM 块并提取相关细节的逻辑:
from langchain_ollama import OllamaLLM
from langchain_core.prompts import ChatPromptTemplate
# Template to instruct Ollama for parsing
template = (
"You are tasked with extracting specific information from the following text content: {dom_content}. "
"Please follow these instructions carefully: \n\n"
"1. **Extract Information:** Only extract the information that directly matches the provided description: {parse_description}. "
"2. **No Extra Content:** Do not include any additional text, comments, or explanations in your response. "
"3. **Empty Response:** If no information matches the description, return an empty string ('')."
"4. **Direct Data Only:** Your output should contain only the data that is explicitly requested, with no other text."
)
# Initialize the Ollama model
model = OllamaLLM(model="phi3")
# Function to parse DOM chunks with Ollama
def parse_with_ollama(dom_chunks, parse_description):
prompt = ChatPromptTemplate.from_template(template)
chain = prompt | model
parsed_results = []
for i, chunk in enumerate(dom_chunks, start=1):
if not chunk.strip(): # Skip empty chunks
print(f"Skipping empty chunk at batch {i}")
continue
try:
print(f"Processing chunk {i}: {chunk[:100]}…") # Print a preview
print(f"Parse description: {parse_description}")
response = chain.invoke(
{
"dom_content": chunk,
"parse_description": parse_description,
}
)
print(f"Response for batch {i}: {response}")
parsed_results.append(response)
except Exception as e:
print(f"Error parsing chunk {i}: {repr(e)}")
parsed_results.append(f"Error: {repr(e)}")
return "\n".join(parsed_results)
指令模板:
- 为 Ollama 提供精确的指导,说明要提取哪些信息。
- 确保输出干净、简洁且与解析描述相关。
块处理:
parse_with_ollama函数遍历 DOM 块,使用 LLM 处理每个块。- 跳过空块以优化性能。
错误处理:
- 妥善处理错误、记录错误并继续处理剩余块。
- 更新文件 ui.py 文件
将以下代码添加到 ui.py 文件,以允许用户向 LLM 输入解析指令并查看结果:
from main import scrape_website, extract_body_content, clean_body_content, split_dom_content
from llm import parse_with_ollama

# rest of the code....

if "dom_content" in st.session_state:
parse_description = st.text_area("Enter a description to extract specific insights from your scraped data:")
if st.button("Parse Content", key="parse_button"):
if parse_description.strip() and st.session_state.get("dom_content"):
st.info("Parsing the content…")
dom_chunks = split_dom_content(st.session_state.dom_content)
parsed_result = parse_with_ollama(dom_chunks, parse_description)
st.text_area("Parsed Results", parsed_result, height=300)
else:
st.error("Please provide valid DOM content and a description to parse.")
用户界面中的工作原理说明如下。
用户输入:
- 用户在文本区域中提供要提取的数据的自然语言描述。
解析触发器:
- 当单击解析内容按钮时,清理后的 DOM 内容将被拆分为可管理的块并传递给
parse_with_ollama。
结果显示:
- 解析结果显示在文本区域中,允许用户查看提取的信息。
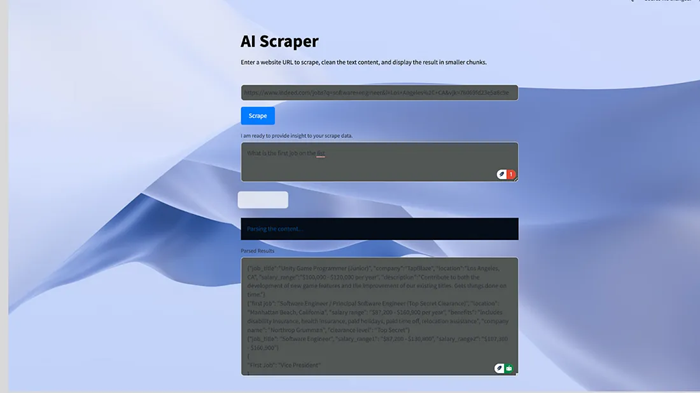
完成此操作后,抓取工具现在可以根据抓取的数据对你的提示做出响应:
7、结束语
网络抓取和人工智能的结合为数据驱动的洞察开辟了令人兴奋的可能性。除了收集和保存数据之外,你现在还可以利用人工智能来优化从抓取的数据中获取洞察的过程。这对营销和销售团队、数据分析、企业主等都很有用。
原文链接:How to Scrape and Analyse Data for Free using AI: From Collection to Insight
汇智网翻译整理,转载请标明出处
