Idefics-2微调实现视觉问答
本文介绍如何使用Transformers库微调Idefics-2视觉大模型,来应对视觉问答任务。

Idefics2 模型于今年 4 月发布。许多博客都可用于微调早期发布的 Idefics-1 (9b) 模型。今天,我们将深入探讨微调视觉语言模型,特别是在免费层的 Colab 环境中。我将尽可能简洁而令人满意地解释一切。如果你是真正的追随者,你必须意识到我通常撰写有关从头开始实现架构的文章。不过,我认为微调 VLM 是一个有很多值得讨论的组成部分的主题。
由于 Idefics-2 已经针对 OCR 的文档数据集长度进行了训练,因此由于 GPU 限制,我们不需要针对更高的epoch进行训练。
1、什么是 Idefics-2?
Idefics 2 是一个通用的多模态模型,它将任意文本和图像序列作为输入,并生成文本响应。它可以回答有关图像的问题、描述视觉内容、基于多幅图像创建故事、从文档中提取信息以及执行基本的算术运算。
Idefics2 在 Idefics1 的基础上进行了改进:拥有 8B 参数、开放许可证 (Apache 2.0) 和增强的 OCR(光学字符识别)功能,Idefics2 为从事多模态工作的社区奠定了坚实的基础。它在视觉问答基准测试中的表现是同类产品中最好的,并且可以与 LLava-Next-34B 和 MM1-30B-chat 等更大的模型相媲美。
Idefics2 也从一开始就集成在 Transformers 中,因此对于许多多模态应用程序来说,很容易进行微调。你现在就可以在 Hub 上试用这些模型!
2、Idefics2快速入门
首先导入依赖库:
!pip install -q transformers==4.40.0 \
               accelerate==0.32.1 \
                datasets==2.20.0 \
                peft==0.12.0 \
                bitsandbytes==0.43.0 \
                wandb==0.17.5
import torch
from peft import LoraConfig, get_peft_model
from transformers import (
AutoProcessor,
BitsAndBytesConfig,
Idefics2ForConditionalGeneration,
AutoTokenizer,
AutoModelForVision2Seq,
Trainer,
TrainingArguments)
from huggingface_hub import login
from datasets import load_dataset
import wandb
wandb.login(key="YOUR_WANDB_API_KEY")2.1 加载模型和数据集
此步骤很简单。我们的目标是使用 4 位量化将模型权重高效地加载到 VRAM 中,从而减少内存使用量。我们通过利用 bitsandbytes 库进行 4 位量化来实现这一点。我们将 compute_dtype 设置为 torch.float16,以进行高效计算,同时以 4 位精度加载模型权重。这种方法在减少内存消耗和保持大多数任务的足够精度之间取得了平衡。如果你之前已经对 hugging face 模型进行了微调,则可以跳过此部分并直接跳到数据整理器。
model_name = "HuggingFaceM4/idefics2-8b"

bnb_config = BitsAndBytesConfig(
    load_in_4bit=True,
    bnb_4bit_use_double_quant=True,
    bnb_4bit_quant_type="nf4",
    bnb_4bit_compute_dtype=torch.float16
)

device = torch.device("cuda:0" if torch.cuda.is_available() else "cpu")

model = AutoModelForVision2Seq.from_pretrained(
    model_name,
    quantization_config=bnb_config,
    device_map=device,
    low_cpu_mem_usage=True
    )
将 bnb_4bit_compute_dtype 设置为 torch.float16 会告诉模型将所有内容计算为 float16 类型。这意味着前向传递、后向传递和梯度更新中的所有计算都将使用 16 位浮点数,从而节省更多空间并减少 float32 精度的推理时间。
但是,不要将这与模型加载的精度混淆,因为我们使用的是 4 位量化,模型的权重以 4 位精度存储在 VRAM 中,但训练模型期间的所有计算都是以 16 位完成的,因此 4 位权重首先转换为更高精度的 float16,然后开始训练。
2.2 低秩自适应
由于该模型有 80 亿个参数,我们对所有参数进行微调是没有意义的,这就是为什么我们将定义要训练哪些层并仅适应这一点。由于 LoRa 或 QLoRa 将大型权重矩阵分解为低维矩阵,因此参数总数已经减少,选择要训练的特定层将进一步帮助我们减少参数。
config = LoraConfig(
        r=8,
        lora_alpha=8,
        lora_dropout=0.1,
        target_modules='.*(text_model|modality_projection|perceiver_resampler).*(k_proj|q_proj|v_proj|o_proj).*|lm_head$',
        init_lora_weights="gaussian"
    )

model = get_peft_model(model, config)
print(model.print_trainable_parameters())
输出:
trainable params: 7,589,912 || all params: 8,410,358,024 || trainable%: 0.0902现在我们已经加载了准备进行训练的模型,让我们继续处理数据集。
2.3 实现 DataCollator
我们首先通过从 Hugging Face 加载数据集来创建艺术作品:
# Download dataset
train_dataset = load_dataset("nielsr/docvqa_1200_examples")["train"]

# Remove columns
train_dataset = train_dataset.remove_columns(["id", "bounding_boxes", "answer"])

# train_dataset[0]["answers"]
现在 Idefics-2 接受特定格式的数据,我们可以创建一个预处理器来将数据集映射到所需的格式,或者最好实现一个数据整理器类。
在 PyTorch 的 DataLoader 类中,我们有一个参数 collate_fn。这与我们希望在此处实现的数据整理器的工作方式类似。在每次迭代期间, data_collator 处理单个样本并执行任何必要的操作(如填充)。然后将它们组合成与模型预期输入格式兼容的批处理。
import random
from transformers import AutoProcessor

# DataCollator
class MyDataCollator:
    def __init__(self, processor):
        self.processor = processor
        self.image_token_id = processor.tokenizer.additional_special_tokens_ids[
            processor.tokenizer.additional_special_tokens.index("<image>")
        ]

    def __call__(self, examples):
        texts = []
        images = []
        for example in examples:
            image = example["image"]
            question = example["query"]["en"]
            answer = random.choice(example["answers"])  #Each example in dataset has a list of answers, we select one randomly
            messages = [
                {
                    "role": "user",
                    "content": [
                        {"type": "text", "text": "Answer briefly."},
                        {"type": "image"},
                        {"type": "text", "text": question}
                    ]
                },
                {
                    "role": "assistant",
                    "content": [
                        {"type": "text", "text": answer}
                    ]
                }
            ]
            text = self.processor.apply_chat_template(messages, add_generation_prompt=False)
            texts.append(text.strip())
            images.append([image])

        batch = self.processor(text=texts, images=images, return_tensors="pt", padding=True)

        labels = batch["input_ids"].clone()
        labels[labels == self.processor.tokenizer.pad_token_id] = self.image_token_id
        batch["labels"] = labels

        return batch

# DataCollator
if __name__ == '__main__':
    processor = AutoProcessor.from_pretrained("HuggingFaceM4/idefics2-8b", do_image_splitting=False)
    data_collator = MyDataCollator(processor)
说明如下:
首先初始化文本和图像列表。开始遍历示例批次。
然后定义图像、微调期间要提示的问题以及作为答案的标题。
接下来将 Idefics 聊天模板应用于消息,这是一个角色内容词典列表。该模型不以常规字符串作为输入,需要提供符合预期格式的输入。
这种格式通常是 Hugging Face 上各种视觉语言模型的通用格式。当您将聊天模板应用于消息时,我们将得到类似以下内容:
User: Answer briefly.<image> Whats in this Image?<end_of_utterance>
Assistant: "The_Caption_Content"<end_of_utterance>
翻译:
用户:简要回答。此图像中有什么?<end_of_utterance>
助手:“The_Caption_Content”<end_of_utterance>'
注意:当你运行上面的单元格时,它可能会提示此处理器没有可用的模板,默认情况下,它将使用 LlamaTokenizerFast 类的模板,这对于我们的用例完全没问题。
现在,在遍历每个示例后,我们将 input_ids 克隆到标签,并用图像标记替换标签中的每个填充标记。这样做是为了让模型在计算损失时不考虑填充标记,为了解决这个问题,我们将其替换为 <image>,这是微调视觉语言模型的标准做法。
最后,在批处理字典中设置标签,并给出标签,以便模型可以计算损失以使其输出与标签中提供的答案标记对齐。
3、训练参数
training_args = TrainingArguments(
    num_train_epochs=2,                 # Number of times to iterate over the entire training dataset
    max_steps=178,                      # Total number of training steps (overrides num_train_epochs if set)
    per_device_train_batch_size=2,      # Batch size per device (GPU/CPU) during training
    gradient_accumulation_steps=8,      # Number of steps to accumulate gradients before updating weights
    warmup_steps=75,                    # Number of steps to perform linear learning rate warmup
    learning_rate=1e-4,                 # Initial learning rate for training
    weight_decay=0.01,                  # Weight decay to apply (L2 regularization)
    logging_steps=5,                    # Number of steps between logging events
    output_dir="Idefics-OCR",           # Directory where model checkpoints and logs will be saved
    save_strategy="steps",              # Strategy to save model checkpoints (e.g., "steps" or "epoch")
    save_steps=25,                      # Number of steps between each model checkpoint save
    save_total_limit=1,                 # Maximum number of checkpoints to keep (older ones are deleted)
    fp16=True,                          # Enable mixed precision training with 16-bit floating-point precision
    remove_unused_columns=False,        # Whether to remove unused columns from the dataset before training
    report_to="wandb"                   # Reporting tool to use for tracking experiments (e.g., "wandb", "tensorboard")
)
最后,我们设置训练器并训练模型:
trainer = Trainer(
    model = model,
    args = training_args,
    data_collator = data_collator,
    train_dataset = train_dataset
)

trainer.train()
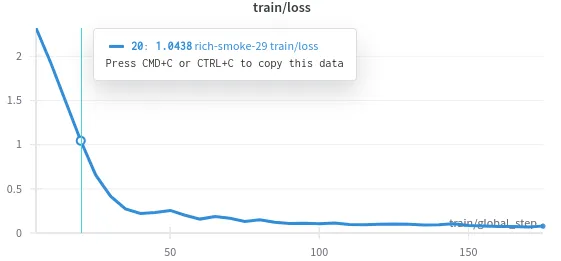
下面是训练/损失图,查看此权重和偏差日志以查看其他指标:

4、执行推理
from transformers import BitsAndBytesConfig, AutoModelForVision2Seq, AutoProcessor
from transformers.image_utils import load_image
import torch

processor = AutoProcessor.from_pretrained("smishr-18/Idefics2-OCR", do_image_splitting=False)

bnb_config = BitsAndBytesConfig(
    load_in_4bit=True,
    bnb_4bit_quant_type="nf4",
    bnb_4bit_compute_dtype=torch.float16
)

device = torch.device("cuda:0" if torch.cuda.is_available() else "cpu")
model = AutoModelForVision2Seq.from_pretrained(
    "smishr-18/Idefics2-OCR",
    quantization_config=bnb_config,
    device_map=device,
    low_cpu_mem_usage=True
    )

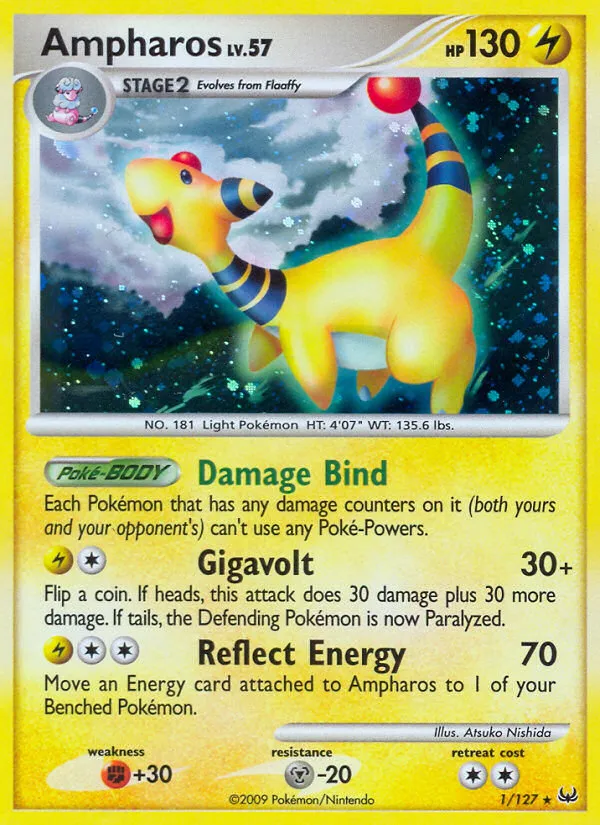
image = "https://images.pokemontcg.io/pl1/1_hires.png"
load_image(image)
question = "What is the reflect energy of Ampharos?"
messages = [
    {
        "role": "user",
        "content": [
            {"type": "text", "text": "Explain."},
            {"type": "image"},
            {"type": "text", "text": question}
        ]
    }
]

text = processor.apply_chat_template(messages, add_generation_prompt=True)
inputs = processor(text=[text.strip()], images=[image4], return_tensors="pt", padding=True)
inputs = {k: v.to(device) for k, v in inputs.items()}

# Generate texts
generated_ids = model.generate(**inputs, max_new_tokens=500)
generated_texts = processor.batch_decode(generated_ids, skip_special_tokens=True)
print(generated_texts)


##### Output #####
# The reflect energy in the image is 70.
就是这样!
5、结束语
你现在可以下载模型并对图像执行视觉查询,可能是 Pokemon 卡或奥利奥背面的营养成分标签,这取决于你。我希望你喜欢这篇文章,并发现它有助于提高 VLM 的地位。
你可以在 GitHub 上找到所有可用的代码,也可以在 Hugging Face 上查看我们微调的模型 Idefics2-OCR。
原文链接:Finetuning Vision Language Model for vQnA on Documents
汇智网翻译整理,转载请标明出处
