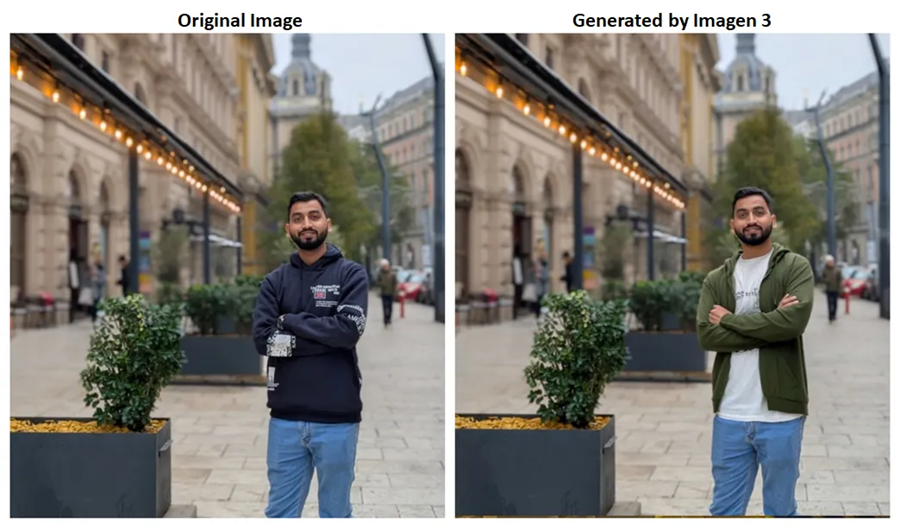
Imagen 3虚拟试穿实现
在这篇博客中,我将向你展示一个有趣的用例,说明如何使用 Imagen 3 查看一套衣服穿在你身上的效果——这是我经常遇到的一个实际问题。

在 2024 年 Google I/O 大会上,Google DeepMind 发布了他们最新的文本转图像模型 Imagen 3,我一直在关注它。与其他扩散模型不同的是,它能够生成高质量、逼真的图像,细节程度令人难以置信。
但它不仅限于生成图像——它还可以帮助你编辑图像。无论是用其他内容替换图像的一部分,还是用扩展图像并添加更多内容,Imagen 3 都能满足你的需求。
在这篇博客中,我将向你展示一个有趣的用例,说明如何使用 Imagen 3 查看一套衣服穿在你身上的效果——这是我经常遇到的一个实际问题。
1、Imagen 3简介
Imagen 3 是一种潜在的扩散模型,可以根据文本提示生成高质量的图像。它是在大量图像、文本和标注数据集上进行训练的,同时还进行了人工和自动评估。请在此处阅读完整的技术报告。
Imagen 3使用的技术之一是提示-图像对齐,它测量输入提示在生成的图像中的反映准确程度。让我们看一个例子来更好地理解这一点。
Prompt: A highly detailed, photo-realistic image of a lady smiling, with natural facial features and soft lighting. The background features a blurred, out-of-focus scene of lush green trees on a bright, sunny day, with warm sunlight casting gentle shadows.提示翻译:一张非常详细、照片般逼真的微笑女士图像,面部特征自然,光线柔和。背景是阳光明媚的日子里郁郁葱葱的绿树模糊、失焦的场景,温暖的阳光投射出柔和的阴影。

对于完全相同的提示,我尝试从三个不同的模型生成图像——FLUX .1 [Dev]、Stable Diffusion 3 和 Imagen 3。根据提示,哪张图像反映了所有属性?我留给你来决定。
Imagen 3 还可以创建富有想象力的视觉效果,例如绘画、素描、艺术品等。以下是我在 Vertex AI 上尝试过的一些提示。

现在我们已经熟悉了 Imagen 3 的功能,让我们更详细地探索我们的用例。
2、处理管道实现
首先确保你能够:
- 访问 Vertex AI 上的 Imagen 3 模型。
- 使用Gemini API(可选):用于零样本检测,将在我们的管道中进一步使用。
- 使用SAM-2:用于创建分割蒙版。
为了清楚地了解该方法,让我们使用管道来说明它:

与往常一样,我们将一起完成编码和概念。你可以从这个存储库克隆 Colab 笔记本开始。
注意:我跳过了安装和导入库和依赖项的代码,以保持本博客简洁。你可以在完整的 Colab 笔记本中找到完整的详细信息。
2.0 配置 Gemini API 密钥和 GCP 项目 ID
首先,让我们配置 Gemini API 密钥和 GCP 项目 ID 以初始化 Vertex AI SDK。
API_KEY = userdata.get('gemini')
genai.configure(api_key=API_KEY)
model = genai.GenerativeModel(model_name='gemini-1.5-pro')

GCP_PROJECT_ID = userdata.get('GCP_PROJECT_ID')
vertexai.init(project=GCP_PROJECT_ID, location="us-central1")
2.1 零样本物体检测
我们首先将输入图像输入 Gemini 模型进行零样本物体检测,以确定需要更换的区域(在本例中为服装)。你可以选择 Gemini 1.5 Flash 或 Gemini 2.0 Flash。
input_image = 'image.jpg'  # @param {type: 'string'}
object_to_detect = 'hoodie' # @param {type: 'string'}
img = PIL.Image.open(input_image)


response = model.generate_content([
    img,
    (
        f"Detect 2d bounding box of {object_to_detect} and return it in the below format"
        "list. \n [ymin, xmin, ymax, xmax, object_name]. If there are more than one object, return separate lists for each object"
    ),
])

result = response.text

bounding_box = parse_bounding_box(result)
output, coordinates = draw_bounding_boxes(img, bounding_box)
虽然此步骤是可选的,但我想确保整个流程完全自动化,无需任何人工干预。但是,如果你无法访问 Gemini API,我提供了另一种方法,无需使用该 API 即可运行此程序。

如你所见,我在输入图像中穿着连帽衫,Gemini 已在图像中准确检测到它。
2.2 在 ROI 内绘制点
由于 SAM-2 仅支持点和框提示,不直接支持文本提示,因此我们在步骤 1 中使用 Gemini 在感兴趣区域周围生成边界框,使其与文本提示兼容。
image = cv2.imread(input_image)
x1, y1, x2, y2 = coordinates[0], coordinates[1], coordinates[2], coordinates[3]
centre_x = (x1+x2)//2
centre_y = (y1+y2)//2

color = (0, 255, 0)
radius = 5

# Draw the points on the image.
p1 = (centre_x, centre_y)
p2 = (centre_x, (centre_y+y1)//2)
p3 = (centre_x, (centre_y+y2)//2)
p4 = ((centre_x+x1)//2, centre_y)
p5 = ((centre_x+x2)//2, centre_y)

points = [p1, p2, p3, p4, p5]

cv2.circle(image, (centre_x, centre_y), radius, color, -1)
cv2.circle(image, (centre_x, (centre_y+y1)//2), radius, color, -1)
cv2.circle(image, (centre_x, (centre_y+y2)//2), radius, color, -1)
cv2.circle(image, ((centre_x+x1)//2, centre_y), radius, color, -1)
cv2.circle(image, ((centre_x+x2)//2, centre_y), radius, color, -1)

image = cv2.cvtColor(image, cv2.COLOR_BGR2RGB)
roi_output = PIL.Image.fromarray(image)
roi_output.save(f'roi_point_{input_image}')
display(roi_output)
2.3 创建分割掩码
现在我们有了这些点,我们可以提示 SAM-2 模型使用最新的 SAM-2.1 模型权重生成分割掩码。
对于此任务,我选择了 SAM 2.1 小型模型检查点,因为它们已经足够。但是,如果你的输入图像包含复杂的片段,请随意选择其他版本。
# Select SAM-2.1 checkpoint and config.
sam2_checkpoint = "sam2.1_hiera_small.pt"  # @param ["sam2.1_hiera_tiny.pt", "sam2.1_hiera_small.pt", "sam2.1_hiera_base_plus.pt", "sam2.1_hiera_large.pt"]
model_config = "sam2.1_hiera_s.yaml" # @param ["sam2.1_hiera_t.yaml", "sam2.1_hiera_s.yaml", "sam2.1_hiera_b+.yaml", "sam2.1_hiera_l.yaml"]

sam2_checkpoint = f"/content/sam2.1_checkpoints/{sam2_checkpoint}"
model_config = f"configs/sam2.1/{model_config}"

sam2_model = build_sam2(model_config, sam2_checkpoint, device="cuda")
mask_generator = SAM2AutomaticMaskGenerator(sam2_model)
predictor = SAM2ImagePredictor(sam2_model)

input_point = np.array([
      [
        point[0],
        point[1]
      ] for point in points
  ])

input_label = np.ones(input_point.shape[0])

predictor.set_image(img)

# Predict the segmentation mask.
masks, scores, logits = predictor.predict(
    point_coords = input_point,
    point_labels = input_label,
    multimask_output = False,
)

mask_img = PIL.Image.fromarray((masks[0]*255).astype(np.uint8))
mask_img.save(f"{annotation}_mask_{input_image}")
display(mask_img)
根据提供给 SAM-2.1 的点,生成的二进制遮罩看起来是准确的,只有少量的噪音。但是,如果你认为可以使用更好的点,我已经编写了一个代码,允许你通过 UI 手动输入点。
2.4 使用 Imagen 3 生成新图像
最后,我们准备使用 Imagen 3 生成新图像并将其修复到分割掩码上。
以下是我们需要作为参数提供的一些配置:
- 基础图像:要编辑的输入图像文件。
- 蒙版文件:要修复的对象的二进制蒙版。
- 提示:生成新图像的输入提示。
- 编辑模式:选项,如修复插入、修复移除或修复外层。
- 蒙版模式:在背景或前景之间选择。
- 膨胀:0 到 1 之间的浮点值,表示提供的蒙版的百分比。
mask_file = f"{annotation}_mask_{input_image}"
output_file = f"output_{input_image}"
prompt = "A dark green hoodie, white shirt inside, waist length" # @param {type: 'string'}

edit_mode = 'inpainting-insert' # @param ['inpainting-insert', 'outpainting', 'inpainting-remove']
mask_mode = 'foreground' # @param ['foreground', 'background']
dilation = 0.01 # @param {type:"slider", min:0, max:1, step:0.01}

edit_model = ImageGenerationModel.from_pretrained("imagen-3.0-capability-001")

base_img = Image.load_from_file(location=input_image)
mask_img = Image.load_from_file(location=mask_file)

raw_ref_image = RawReferenceImage(image=base_img, reference_id=0)
mask_ref_image = MaskReferenceImage(
    reference_id=1, image=mask_img, mask_mode=mask_mode, dilation=dilation
)

edited_image = edit_model.edit_image(
    prompt=prompt,
    edit_mode=edit_mode,
    reference_images=[raw_ref_image, mask_ref_image],
    number_of_images=1,
    safety_filter_level="block_some",
    person_generation="allow_adult",
)

edited_image[0].save(output_file)
edited_image[0].show()
这看起来太棒了,几乎完美。
3、结束语
在购物时选择服装时,我通常很慢而且犹豫不决,但有了 Imagen 3 令人印象深刻的生成和编辑功能,我想这不再是问题了。😜
有了这些最先进的模型,未来肯定是光明的,我很高兴看到你将使用 Imagen 3 创造出令人惊叹的东西。同时,我们还会再见,还有更多精彩内容。
原文链接:Virtual Try-On with Imagen 3
汇智网翻译整理,转载请标明出处