大模型的解禁技术 (abliteration)
在这篇文章中,我们将探讨一种称为“abliteration”的方法,该方法可以在不重新训练的情况下解禁任何LLM。
第三代Llama模型提供了经过微调(Instruct)版本,这些版本在理解和遵循指令方面表现出色。然而,这些模型被严重审查,设计为拒绝被视为有害的请求,并以“作为AI助手,我无法帮助你”之类的响应来回应。虽然这种安全功能对于防止误用至关重要,但它限制了模型的灵活性和响应能力。
在这篇文章中,我们将探讨一种称为“abliteration”的方法,该方法可以在不重新训练的情况下解禁任何LLM。这种方法有效地去除了模型内置的拒绝机制,使其能够响应所有类型的提示。
代码可在Google Colab上获取,并且在GitHub上的LLM课程中也有提供。特别感谢FailSpy对本文进行校对。
1、什么是abliteration?
现代LLM经过安全性和指令跟随的微调,这意味着它们被训练为拒绝有害请求。在他们的博客文章中,Arditi等人展示了这种拒绝行为是由模型残差流中的特定方向介导的。如果我们阻止模型表示这个方向,它就会失去拒绝请求的能力。相反,人为地添加这个方向会导致模型拒绝即使是无害的请求。
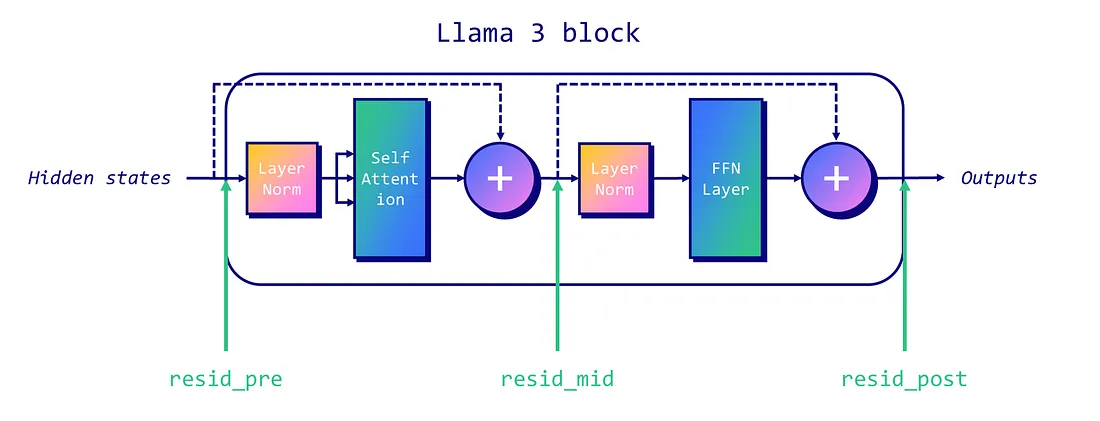
在传统的解码器-only Llama-like架构中,有三个残差流我们可以针对:每个块开始时(“pre”)、注意力层和MLP层之间(“mid”),以及MLP之后(“post”)。下图说明了每个残差流的位置。
为了删除一个LLM的审查,我们首先需要在模型中识别出“拒绝方向”。这一过程涉及一些技术步骤:
- 数据收集:运行模型处理一组有害指令和一组无害指令,在每个指令的最后一个标记位置记录残差流激活。
- 平均差异:计算有害指令和无害指令激活的平均差异。这给我们一个向量,代表模型每层的“拒绝方向”。
- 选择:归一化这些向量并评估它们以选择最佳的“拒绝方向”。
一旦我们确定了拒绝方向,就可以对其进行“删除”,从而有效去除模型表示此特征的能力。这可以通过推理时干预或通过权重正交化永久实现。
让我们先谈谈推理时干预。对于写入残差流的所有组件(如注意力头),我们计算其输出投影到拒绝方向上的值,并从中减去这个投影。这种减法应用于每个标记和每层,确保模型永远不会表示拒绝方向。
另一方面,权重正交化涉及直接修改模型权重。通过将组件权重与拒绝方向正交化,它可以防止模型完全写入此方向。这是通过对写入残差流的矩阵进行调整实现的,确保它们不会贡献于拒绝方向。
在下一节中,我们将使用权重正交化实现删除技术。
2、实现
以下删除技术的实现基于FailSpy的笔记本,该笔记本本身基于原始作者的notebook。我主要进行了改编和简化,以便更容易理解。本节代码较多,可以让你了解发生了什么,但如果你对技术细节不太感兴趣,可以直接使用FailSpy的删除库(也可以查看他在Hugging Face上的一系列abliteration模型)。
代码依赖于出色的TransformerLens库(以前称为EasyTransformer)来完成繁重的工作。它是为机械可解释性而设计的,这里用于干预激活。感谢Neel Nanda和Joseph Bloom创建和维护了这个库。
首先,让我们安装必要的包并导入它们。所有这些步骤都可以在这个Google Colab笔记本中找到。
!pip install transformers transformers_stream_generator tiktoken transformer_lens einops jaxtyping

import torch
import functools
import einops
import gc

from datasets import load_dataset
from tqdm import tqdm
from torch import Tensor
from typing import List
from transformer_lens import HookedTransformer, utils
from transformer_lens.hook_points import HookPoint
from transformers import AutoModelForCausalLM, AutoTokenizer
from jaxtyping import Float, Int
from collections import defaultdict

# 关闭自动微分以节省GPU内存(感谢Undi95)
torch.set_grad_enabled(False)
我们需要两个数据集:一个包含无害指令,另一个包含有害指令。我们将使用tatsu-lab/alpaca以及来自llm-attacks的数据。为了方便起见,我已经将它们打包成两个Hugging Face数据集:mlabonne/harmless_alpaca和mlabonne/harmful_behaviors。这样,你可以轻松替换为自己的数据集。
我们将加载指令并将其重新格式化为包含“role”和“content”键的字典列表。这使得它与apply_chat_tokenizer()方法兼容,我们将使用该方法遵循Llama 3的聊天模板。
def reformat_texts(texts):
    return [[{"role": "user", "content": text}] for text in texts]

# 获取有害和无害指令
def get_harmful_instructions():
    dataset = load_dataset('mlabonne/harmful_behaviors')
    return reformat_texts(dataset['train']['text']), reformat_texts(dataset['test']['text'])

def get_harmless_instructions():
    dataset = load_dataset('mlabonne/harmless_alpaca')
    return reformat_texts(dataset['train']['text']), reformat_texts(dataset['test']['text'])

harmful_inst_train, harmful_inst_test = get_harmful_instructions()
harmless_inst_train, harmless_inst_test = get_harmless_instructions()
现在我们有了数据集,可以加载要删除的模型。不幸的是,你不能直接使用HookedTransformer加载自定义模型。在这里,我使用了FailSpy笔记本中描述的一个技巧,下载自定义模型并将其命名为meta-llama/Meta-Llama-3-8B-Instruct。如果GPU不支持BF16,请以torch.float16格式加载。
在这个示例中,我们将使用mlabonne/Daredevil-8B,这是一个使用DARE TIES(参见我的关于模型合并的文章)创建的mega-merge,它在Open LLM Leaderboard的8B类别中具有最高的MMLU分数。
MODEL_ID = "mlabonne/Daredevil-8B"
MODEL_TYPE = "meta-llama/Meta-Llama-3-8B-Instruct"

# 下载并加载模型
!git clone https://huggingface.co/{MODEL_ID} {MODEL_TYPE}

# 加载模型和分词器
model = HookedTransformer.from_pretrained_no_processing(
    MODEL_TYPE,
    local_files_only=True,
    dtype=torch.bfloat16,
    default_padding_side='left'
)
tokenizer = AutoTokenizer.from_pretrained(MODEL_TYPE)
tokenizer.padding_side = 'left'
tokenizer.pad_token = tokenizer.eos_token
我们现在可以对数据集进行分词。我们使用的无害和有害指令数量相同。请注意,大量样本可能会耗尽RAM/VRAM,这就是为什么我限制为256的原因。
def tokenize_instructions(tokenizer, instructions):
    return tokenizer.apply_chat_template(
        instructions,
        padding=True,
        truncation=False,
        return_tensors="pt",
        return_dict=True,
        add_generation_prompt=True,
    ).input_ids

n_inst_train = min(256, len(harmful_inst_train), len(harmless_inst_train))

# 分词数据集
harmful_tokens = tokenize_instructions(
    tokenizer,
    instructions=harmful_inst_train[:n_inst_train],
)
harmless_tokens = tokenize_instructions(
    tokenizer,
    instructions=harmless_inst_train[:n_inst_train],
)
一切准备就绪,我们现在可以实施删除的第一步:数据收集。我们要处理这些分词后的数据集,并将残差流激活存储在harmful和harmless中。这由transformer_lens库管理。
batch_size = 32

# 初始化defaultdicts来存储激活
harmful = defaultdict(list)
harmless = defaultdict(list)

# 在批次中处理训练数据
num_batches = (n_inst_train + batch_size - 1) // batch_size

for i in tqdm(range(num_batches)):
    print(i)
    start_idx = i * batch_size
    end_idx = min(n_inst_train, start_idx + batch_size)

    # 对有害和无害提示运行模型,缓存激活
    harmful_logits, harmful_cache = model.run_with_cache(
        harmful_tokens[start_idx:end_idx],
        names_filter=lambda hook_name: 'resid' in hook_name,
        device='cpu',
        reset_hooks_end=True
    )
    harmless_logits, harmless_cache = model.run_with_cache(
        harmless_tokens[start_idx:end_idx],
        names_filter=lambda hook_name: 'resid' in hook_name,
        device='cpu',
        reset_hooks_end=True
    )

    # 收集并存储激活
    for key in harmful_cache:
        harmful[key].append(harmful_cache[key])
        harmless[key].append(harmless_cache[key])

    # 清理RAM和VRAM
    del harmful_logits, harmless_logits, harmful_cache, harmless_cache
    gc.collect()
    torch.cuda.empty_cache()

# 连接缓存的激活
harmful = {k: torch.cat(v) for k, v in harmful.items()}
harmless = {k: torch.cat(v) for k, v in harmless.items()}
现在我们可以计算每层的拒绝方向。这对应于有害和无害指令激活的平均差异,然后归一化。我们在activation_scored中按降序排序它们。
# 辅助函数以获取激活索引
def get_act_idx(cache_dict, act_name, layer):
    key = (act_name, layer)
    return cache_dict[utils.get_act_name(*key)]

# 计算中间层有害和无害激活之间的均值差异
activation_layers = ["resid_pre", "resid_mid", "resid_post"]
activation_refusals = defaultdict(list)

for layer_num in range(1, model.cfg.n_layers):
    pos = -1  # 位置索引
    for layer in activation_layers:
        harmful_mean_act = get_act_idx(harmful, layer, layer_num)[:, pos, :].mean(dim=0)
        harmless_mean_act = get_act_idx(harmless, layer, layer_num)[:, pos, :].mean(
            dim=0
        )
        refusal_dir = harmful_mean_act - harmless_mean_act
        refusal_dir = refusal_dir / refusal_dir.norm()
        activation_refusals[layer].append(refusal_dir)

selected_layers = ["resid_pre"]
activation_scored = sorted(
    [
        activation_refusals[layer][l - 1]
        for l in range(1, model.cfg.n_layers)
        for layer in selected_layers
    ],
    key=lambda x: abs(x.mean()),
    reverse=True,
删除过程的最后一部分包括评估我们计算出的拒绝方向。为此,我们将在推理过程中将拒绝方向应用于每个残差流和每个块。在下面的代码片段中,我们为四个测试有害指令生成文本,并检查20个块(或层)。
def _generate_with_hooks(
    model: HookedTransformer,
    tokenizer: AutoTokenizer,
    tokens: Int[Tensor, "batch_size seq_len"],
    max_tokens_generated: int = 64,
    fwd_hooks=[],
) -> List[str]:
    all_tokens = torch.zeros(
        (tokens.shape[0], tokens.shape[1] + max_tokens_generated),
        dtype=torch.long,
        device=tokens.device,
    )
    all_tokens[:, : tokens.shape[1]] = tokens
    for i in range(max_tokens_generated):
        with model.hooks(fwd_hooks=fwd_hooks):
            logits = model(all_tokens[:, : -max_tokens_generated + i])
            next_tokens = logits[:, -1, :].argmax(
                dim=-1
            )  # 贪婪采样(温度=0)
            all_tokens[:, -max_tokens_generated + i] = next_tokens
    return tokenizer.batch_decode(
        all_tokens[:, tokens.shape[1] :], skip_special_tokens=True
    )

def get_generations(
    model: HookedTransformer,
    tokenizer: AutoTokenizer,
    instructions: List[str],
    fwd_hooks=[],
    max_tokens_generated: int = 64,
    batch_size: int = 4,
) -> List[str]:
    generations = []
    for i in tqdm(range(0, len(instructions), batch_size)):
        tokens = tokenize_instructions(
            tokenizer, instructions=instructions[i : i + batch_size]
        )
        generation = _generate_with_hooks(
            model,
            tokenizer,
            tokens,
            max_tokens_generated=max_tokens_generated,
            fwd_hooks=fwd_hooks,
        )
        generations.extend(generation)
    return generations

# 推理时干预钩子
def direction_ablation_hook(
    activation: Float[Tensor, "... d_act"],
    hook: HookPoint,
    direction: Float[Tensor, "d_act"],
):
    if activation.device != direction.device:
        direction = direction.to(activation.device)
    proj = (
        einops.einsum(
            activation, direction.view(-1, 1), "... d_act, d_act single -> ... single"
        )
        * direction
    )
    return activation - proj

# 测试基线
N_INST_TEST = 4
baseline_generations = get_generations(
    model, tokenizer, harmful_inst_test[:N_INST_TEST], fwd_hooks=[]
)

# 评估前面定义的层(需要人工评估以确定最佳层用于拒绝抑制)
EVAL_N = 20  # 评估前N个潜在方向
evals = []
for refusal_dir in tqdm(activation_scored[:EVAL_N]):
    hook_fn = functools.partial(direction_ablation_hook, direction=refusal_dir)
    fwd_hooks = [
        (utils.get_act_name(act_name, layer), hook_fn)
        for layer in list(range(model.cfg.n_layers))
        for act_name in activation_layers
    ]
    intervention_generations = get_generations(
        model, tokenizer, harmful_inst_test[:N_INST_TEST], fwd_hooks=fwd_hooks
    )
    evals.append(intervention_generations)
我们将所有生成的文本存储在evals列表中。现在我们可以打印它们并手动选择每个指令的最佳层(块)以提供无审查的回答。我自动排除包含“I cannot”和“I can't”的回答以过滤掉不需要的答案。
如果你找不到满足这些要求的层,你可能需要测试前面selected_layers列表中的其他残差流、其他指令或额外的块等。
# 打印生成的文本供人工评估
blacklist = ["I cannot", "I can't"]
for i in range(N_INST_TEST):
    print(f"\033[1mINSTRUCTION {i}: {harmful_inst_test[i]}")
    print(f"\nBASELINE COMPLETION:\n{baseline_generations[i]}\033[0m")
    for layer_candidate in range(EVAL_N):
        if not any(word in evals[layer_candidate][i] for word in blacklist):
            print(f"\n---\n\nLAYER CANDIDATE #{layer_candidate} INTERVENTION COMPLETION:")
            print(evals[layer_candidate][i])
在我的情况下,第9层候选者成功为四个指令提供了无审查的回答。这就是我们将选择用于拒绝方向的层。接下来,我们实现权重正交化以修改权重并防止模型生成具有此方向的输出。你可以通过打印生成的文本验证模型是否成功解禁。
def get_orthogonalized_matrix(
    matrix: Float[Tensor, "... d_model"], vec: Float[Tensor, "d_model"]
) -> Float[Tensor, "... d_model"]:
    proj = (
        einops.einsum(
            matrix, vec.view(-1, 1), "... d_model, d_model single -> ... single"
        )
        * vec
    )
    return matrix - proj

# 选择具有最高潜在拒绝方向的层
LAYER_CANDIDATE = 9
refusal_dir = activation_scored[LAYER_CANDIDATE]

# 正交化模型的权重
if refusal_dir.device != model.W_E.device:
    refusal_dir = refusal_dir.to(model.W_E.device)
model.W_E.data = get_orthogonalized_matrix(model.W_E, refusal_dir)

for block in tqdm(model.blocks):
    if refusal_dir.device != block.attn.W_O.device:
        refusal_dir = refusal_dir.to(block.attn.W_O.device)
    block.attn.W_O.data = get_orthogonalized_matrix(block.attn.W_O, refusal_dir)
    block.mlp.W_out.data = get_orthogonalized_matrix(block.mlp.W_out, refusal_dir)

# 使用删除模型生成文本
orthogonalized_generations = get_generations(
    model, tokenizer, harmful_inst_test[:N_INST_TEST], fwd_hooks=[]
)

# 打印生成的文本
for i in range(N_INST_TEST):
    if len(baseline_generations) > i:
        print(f"INSTRUCTION {i}: {harmful_inst_test[i]}")
        print(f"\033[92mBASELINE COMPLETION:\n{baseline_generations[i]}")
    print(f"\033[91mINTERVENTION COMPLETION:\n{evals[LAYER_CANDIDATE][i]}")
    print(f"\033[95mORTHOGONALIZED COMPLETION:\n{orthogonalized_generations[i]}\n")
我们现在可以使用模型了。我们将模型转换回Hugging Face格式并上传到HF Hub。
# 将模型转换回HF safetensors
hf_model = AutoModelForCausalLM.from_pretrained(MODEL_TYPE, torch_dtype=torch.bfloat16)
lm_model = hf_model.model

state_dict = model.state_dict()
lm_model.embed_tokens.weight = torch.nn.Parameter(state_dict["embed.W_E"].cpu())
for l in range(model.cfg.n_layers):
    lm_model.layers[l].self_attn.o_proj.weight = torch.nn.Parameter(
        einops.rearrange(
            state_dict[f"blocks.{l}.attn.W_O"], "n h m->m (n h)", n=model.cfg.n_heads
        ).contiguous()
    )
    lm_model.layers[l].mlp.down_proj.weight = torch.nn.Parameter(
        torch.transpose(state_dict[f"blocks.{l}.mlp.W_out"], 0, 1).contiguous()
    )

hf_model.push_to_hub(f"{MODEL_ID}-abliterated")
3、DPO微调
我在上一节中的删除和源模型在Open LLM Leaderboard和Nous的基准套件上进行了评估。以下是结果:

正如你所见,源模型显著优于Llama 3 8B Instruct。然而,我们在删除版本中观察到所有基准测试中的性能下降。删除过程成功解禁了模型,但也降低了模型的质量。
为了解决这个问题,一个想法是进一步训练我们的删除模型以修复它。像大多数微调模型一样,Llama 3 8B Instruct在监督微调方面相当脆弱。额外的SFT很可能会破坏模型的性能。
另一方面,偏好对齐非常轻量级,不应该使我们的删除模型失能。DPO是一个很好的候选者,因为它易于使用并且有着良好的记录。为了实现它,我使用了LazyAxolotl(感谢Wing Lian创建Axolotl),并使用了mlabonne/orpo-dpo-mix-40k数据集。以下是配置:
base_model: mlabonne/Daredevil-8B-abliterated
model_type: LlamaForCausalLM
tokenizer_type: AutoTokenizer

load_in_8bit: false
load_in_4bit: true
strict: false
save_safetensors: true

rl: dpo
chat_template: chatml
datasets:
  - path: mlabonne/orpo-dpo-mix-40k
    split: train
    type: chatml.intel

dataset_prepared_path:
val_set_size: 0.0
output_dir: ./out

adapter: qlora
lora_model_dir:

sequence_len: 2048
sample_packing: false
pad_to_sequence_len: false

lora_r: 64
lora_alpha: 32
lora_dropout: 0.05
lora_target_linear: true
lora_fan_in_fan_out:

wandb_project: axolotl
wandb_entity:
wandb_watch:
wandb_name:
wandb_log_model:

gradient_accumulation_steps: 8
micro_batch_size: 1
num_epochs: 1
optimizer: paged_adamw_8bit
lr_scheduler: cosine
learning_rate: 5e-6
train_on_inputs: false
group_by_length: false

bf16: auto
fp16:
tf32:

gradient_checkpointing: true
early_stopping_patience:
resume_from_checkpoint:
local_rank:
logging_steps: 1
xformers_attention:
flash_attention: true
warmup_steps: 100
evals_per_epoch: 0
eval_table_size:
eval_table_max_new_tokens: 128
saves_per_epoch: 1
debug:
deepspeed: deepspeed_configs/zero2.json
weight_decay: 0.0
special_tokens:
  pad_token: <|end_of_text|>
我使用6个A6000 GPU和Deepspeed ZeRO-2进行训练。训练大约花费了6小时45分钟。以下是我在W&B上获得的训练曲线:
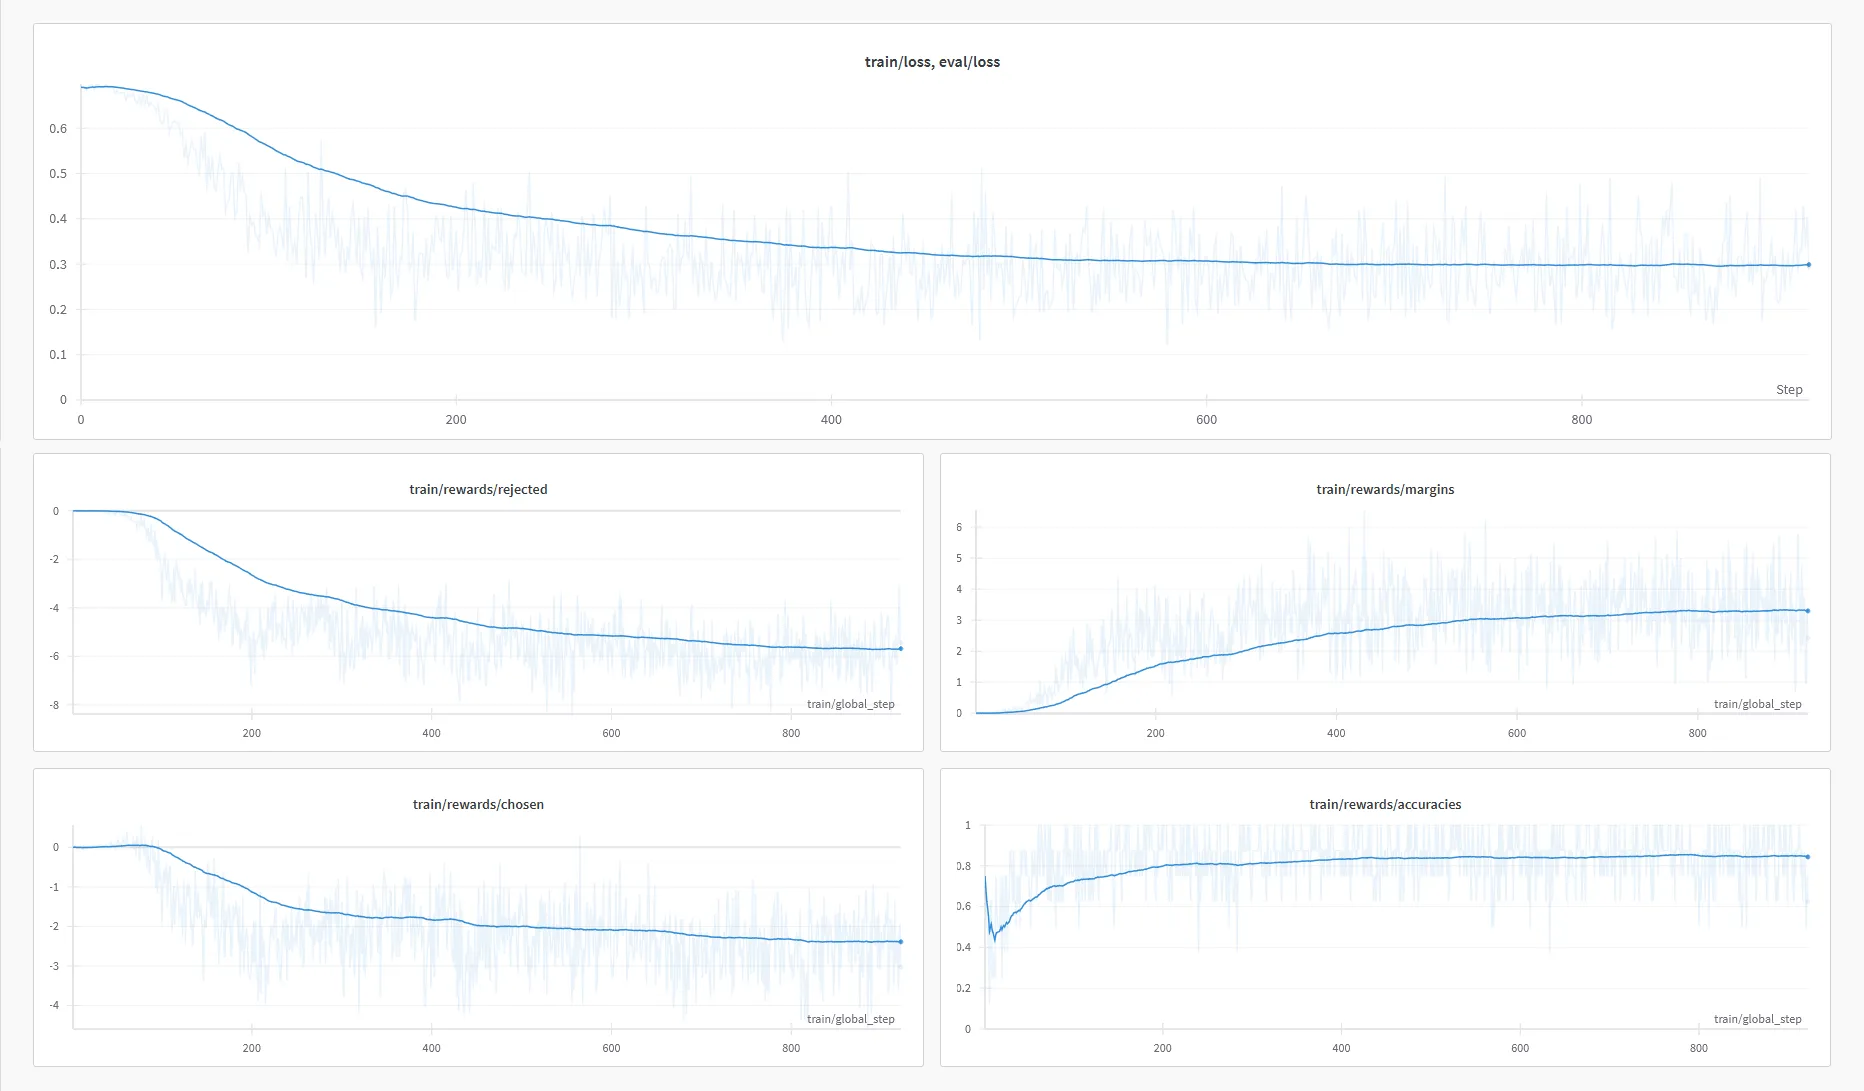
它自动上传了DPO微调模型,称为mlabonne/NeuralDaredevil-8B-abliterated。为了查看它是否解决了删除版本的问题,我在相同的基准测试中对其进行了评估:

我们可以看到,这种额外的训练允许我们恢复大部分由于删除而导致的性能下降。模型没有改进的一个领域是GSM8K,一个数学数据集,这可能意味着orpo-dpo-mix-40k可以从更多的数学样本中受益。
最终模型是一个无审查的LLM,在8B类别中具有最先进的性能。我推荐它作为Llama 3 8B Instruct的改进版本,当你不需要审查时。你可以在LM Studio中尝试量化版本,如GGUF。
4、结束语
在这篇文章中,我们介绍了abliteration的概念。该技术使用模型在无害和有害提示上的激活来计算拒绝方向。然后使用该方向修改模型的权重,确保我们停止输出拒绝。这项技术还展示了安全性微调的脆弱性并提出了伦理考虑。
我们将删除技术应用于Daredevil-8B以解禁它,这也降低了模型的性能。然后我们使用DPO修复它,创建了NeuralDaredevil-8B模型,这是一个完全无审查且高质量的8B LLM。删除技术不仅限于移除对齐,应该被视为一种无需重新训练的微调形式。实际上,它可以创造性地应用于其他目标,比如FailSpy的MopeyMule,它采用了一种忧郁的对话风格。
原文链接:Uncensor any LLM with abliteration
汇智网翻译整理,转载请标明出处