PaliGemma2微调优化图像理解
通过使用自定义数据集(例如知名的 VQA)对 PalliGema2 进行微调,可以在高度特定的任务上实现最先进的性能,以连续且可扩展的方式弥合文本和视觉理解之间的差距。
几年前,从事计算机视觉工作并解决与图像中的文本提取和理解相关的需求的数据科学家依赖于当时最好的可用工具:传统的 OCR 模型。这些模型基于字符检测和文本识别技术,例如用于检测的 CRAFT 和 EAST,以及用于识别的 Tesseract 或更复杂的神经网络。
典型的工作流程分为几个明确的步骤:
- 图像预处理:提高质量、校正旋转,甚至在某些情况下进行二值化。
- 文本检测和识别:使用 EasyOCR 或 PaddleOCR 等库来端到端执行该过程。
这些工具提供了令人满意的结果,并有可能针对特定场景进行微调。但是,它们有局限性,特别是对于低质量图像或更复杂的脚本,例如手写文本。
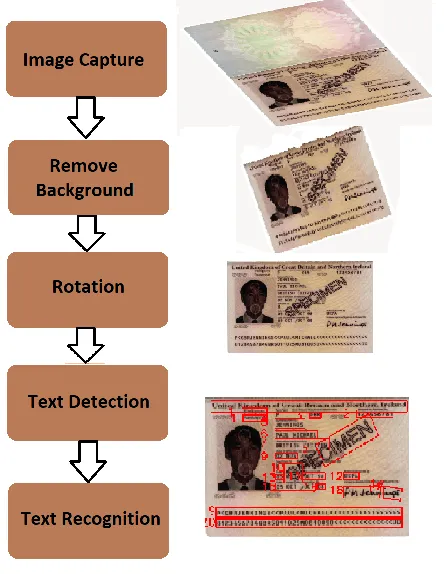
图 1 中所示的工作流程从图像捕获开始,然后是初始预处理步骤,例如背景去除以隔离相关内容和旋转校正以确保正确对齐。经过这些调整后,文本区域将被检测和分割,以便进行重点处理。最后,对分割后的区域进行文本识别,从而提取所需的信息。
1、无后处理的 OCR:不完整的解决方案
图 2 展示了应用于护照的 OCR 示例,其中从各个区域提取文本,包括护照号码、姓名和出生日期。
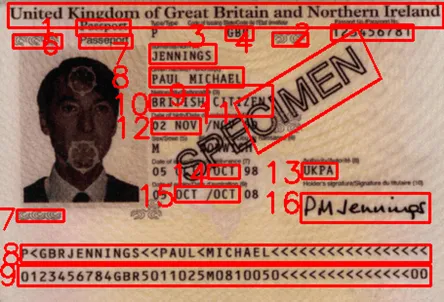
传统的 OCR 输出结构如下:
- 边界框:坐标
[x, y]定义检测到的文本区域的角(例如,United Kingdom of Great Britain and Northern Ireland对应的[[6, 2], [454, 2], [454, 26], [6, 26]])。 - 检测到的文本:从指定区域提取的文本(例如,“Passport”)。
- 置信度分数:模型对检测的置信度,范围从 0 到 1(例如 0.8215)。
此格式允许精确提取重要细节,例如护照号、姓名和日期,同时提供准确度估计。
尽管 OCR 能够提取文本,但其原始输出(仅包含文本及其坐标)通常不足以满足业务需求。OCR 缺乏解释不同文本段之间关系的能力。例如,它无法确定哪些提取的数据代表人的姓名、护照号或出生日期。这一差距凸显了需要额外的后处理或上下文感知模型来为文本赋予含义并以与特定业务应用程序(例如身份验证或文档管理)一致的方式对其进行结构化。如果没有这个关键步骤,OCR 结果在实际使用中仍然是不完整的解决方案。
对于涉及结构化文档的此类情况,可以实施简单的 NLP 规则来一致地提取关键信息,例如姓名、日期和号码。这些规则可以利用图像中的特定位置或依赖某些关键字来指导提取过程。这种 OCR + 后处理工作流程简单、计算成本低,并且对于许多问题都很有效。然而,在更复杂的情况下,它可能会遇到与图像质量或文档布局变化相关的重大挑战。
必须强调的是,如果传统的 OCR 工作流程能够充分解决你的业务问题,那么由于其简单、有效和低成本,它应该被视为首选方案。然而,这种方法通常在具有结构化布局和高质量图像的简单场景中效果最佳。对于更复杂的情况,可能需要高级解决方案才能获得一致且准确的结果。
2、LLM 在 OCR 后处理中的进步
随着大型语言模型 (LLM) 的兴起,从图像中提取的文本现在可以更精确、更灵活地处理。OCR + LLM 工作流程已成为从图像中理解文本的重要里程碑,具有显著的优势:
- 更好的上下文解释:LLM 可以在文本的视觉上下文中理解其含义。
- 高级自动化:它们可以更简单地解决复杂问题。
局限性:
- 视觉信息丢失:可能无法完全捕获关键视觉元素,例如颜色、格式或其他设计特征。
- 计算成本高:虽然 LLM 提供了强大的功能,但它们的使用可能非常耗费资源,尤其是对于大规模数据集。
- 上下文依赖性:结果可能因初始 OCR 的质量和所应用的特定模型而异。
OCR + LLM 成功示例:
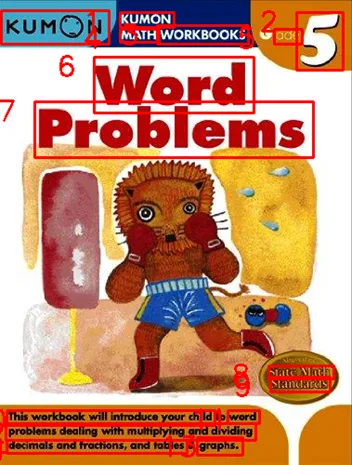
在图 3 中,当我们将传统 OCR 库 EasyOCR 的结果放入 最先进的商业 LLM 模型Claude 3.5 时,我们在理解文本区域方面取得了巨大的成果。我们问:“这本书的名字是什么?根据图像 OCR 结果回答:……(这里,我们提供了带有文本和从 EasyOCR 获得的置信度分数的边界框)”,答案是:
根据 OCR 结果,这本书似乎是一本“KUMON MATH WORKBOOKS Word Problems”书,具体标记为“pce 5”(可能表示特定级别或系列号)。
这表明 OCR + LLM 可以很好地协同工作,尤其是在处理像护照这样定义明确的布局时。如果 OCR 输出清晰且结构化,OCR + LLM 的组合非常令人满意,可以提供精确的提取和上下文理解。在这种情况下,这些工具的组合不仅可以提高准确性,还可以简化后处理任务,使其成为具有一致布局和清晰文本区域的文档的绝佳解决方案。
3、多模态模型:图像中文本理解的现在和未来
最近,多模态模型已成为一种强大的替代方案。这些模型集成了视觉和文本信息,使它们能够以统一的流程理解图像和文本。
潜力:
- 统一提取和理解:它们消除了对分为 OCR 和后处理的管道的需求。
- 更好地关联视觉和文本元素:它们在复杂场景中更准确,例如具有多种价格和尺寸的促销标签。
局限性:
- 成本更高:与 LLM 一样,多模态模型的计算成本很高。
- 训练和适应:它们依赖于特定数据来在细分问题中提供最佳结果。
我们很幸运生活在生成式人工智能取得重大进步的时代。具体来说,在旨在理解图像中文本的多模态模型领域,我们现在有几个开源模型,其性能水平可与最近的封闭模型(如 GPT-4o 和 Claude 3.5-Sonnet)相媲美。
如图 4 所示,Qwen2-VL-72B 目前以 74.8 的平均分位居 OpenVLM 排行榜榜首,在语言和视觉任务中均表现出色。其他模型(如 InternVL2 和 PalliGema 3B)也具有竞争力,尤其是对于较简单的任务,同时运行在 T4 GPU 等更易访问的硬件上。
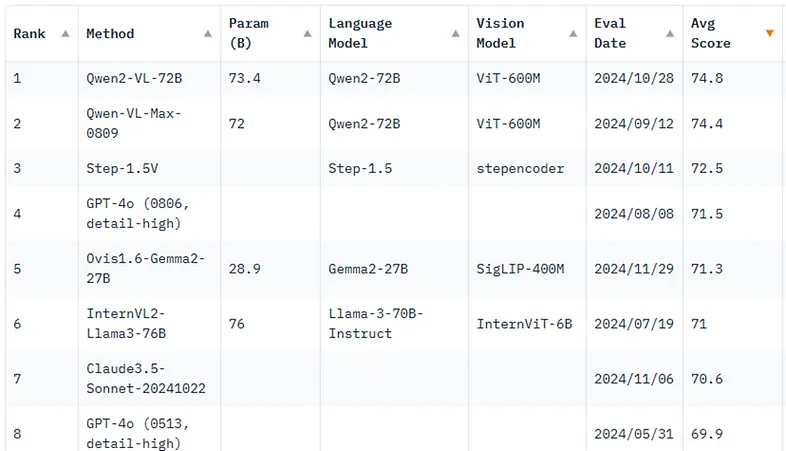
对于较简单的任务,可以使用较小的模型(如 QwenVL 2B、InternVL 2B 和 PaliGemma 3B),同时以较低的成本和推理时间保持性能。评估量化版本的使用也很重要,因为这些版本可以降低成本和推理时间,同时保持相似的性能。
在下一节中,我们将探索 PaliGemma2 的微调,研究多模态模型解决从图像中提取复杂信息问题的潜力,确保解决方案在业务环境中既精确又可扩展。
4、PaliGemma2 架构:集成视觉和语言
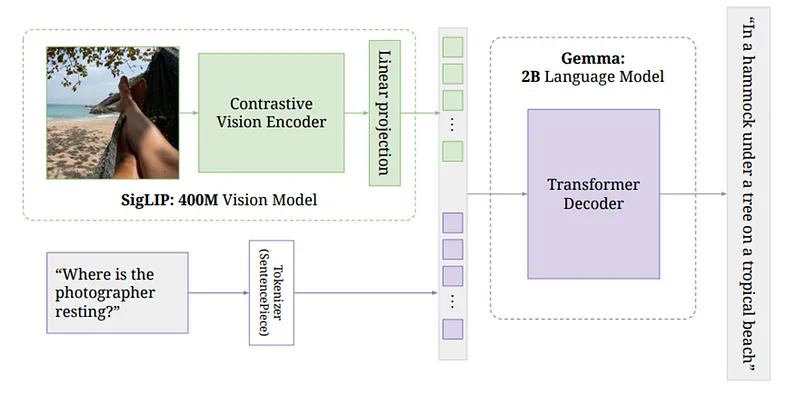
在图 5 中,我们可以看到 PalliGema2 模型的架构,该模型集成了视觉和语言模型。这是图像文本理解多模态方法的一部分。
PalliGema2 架构概述:
- SigLIP 视觉模型:此组件处理来自图像的视觉信息。该模型是一个大型对比视觉编码器,经过 4 亿张图像的训练。编码器从图像中提取视觉特征,例如对象、文本和空间关系。
- 线性投影:视觉模型处理图像后,输出特征通过线性投影层。此步骤将视觉特征转换为与语言模型兼容的格式,确保正确编码提取的视觉信息以供后续处理。
- Gemma 语言模型:然后,将视觉特征输入 Gemma,这是一个基于 2B 参数转换器的语言模型。Gemma 解释集成的视觉和文本信息。它的工作原理是使用转换器解码器根据输入数据生成有意义的上下文感知输出。例如,如果输入包含一个问题,例如“摄影师在哪里休息?”以及图像,Gemma 能够通过从视觉和文本线索中汲取灵感来提供相关且准确的答案。
在这种架构中,视觉模型提供了对图像的基础理解,而语言模型 Gemma 则获取这些信息并将其与其强大的语言理解能力相结合,以生成包含图像内容和任何相关文本的答案。
这种多模式方法避免了对单独的 OCR 和后处理管道的需求,为提取和理解图像中的文本提供了一个统一的系统。这使得它对于复杂的用例特别有价值,例如具有多个元素和布局的文档或理解场景中的文本。
5、用于微调的数据集:机构名称 VQA
为了微调 PaliGemma2 模型以实现图像中的高级文本理解,我们创建了一个自定义数据集,专门针对专注于机构名称的视觉问答 (VQA) 任务。该数据集在 Hugging Face 上公开提供,网址为 bernardomota/establishment-name-vqa。
该数据集包含机构图像,并配有问题和相应的答案,以增强模型在特定视觉环境中提取和理解文本的能力。示例多种多样,涵盖各种图像质量、角度和文本位置,以确保稳健的训练。
在本节中,我们将介绍用于创建 Establishment-Name VQA 数据集的代码。该过程包括准备机构图像、创建与图像相关的问题以及生成相应的答案。这些问题旨在帮助模型理解并从视觉输入中提取机构名称。
5.1 安装依赖项
首先,从 Hugging Face 安装数据集库:
%pip install datasets==2.165.2 导入库
我们需要以下库来处理图像、与 Google Drive 交互以及使用数据集:
import os
from google.colab import drive
from PIL import Image, ImageOps
import random
import datasets
5.3 生成图像问题
此函数生成与识别图像中机构名称相关的一般问题列表。这些问题将作为问答任务的输入。
def generate_image_questions():
    """
    Generates a list of questions related to identifying the name of the establishment from an image.
    Returns:
        list: A list of questions.
    """
    general_questions = [
        "What is the name of the establishment in the image?",
        "Can you identify the establishment's name from the image?",
        "Which establishment does the image refer to?",
        "What is the visible name of the establishment in this image?",
        "From the image, what is the establishment's name?",
        "Does the image display the name of any establishment? If so, what is it?",
        "What is the business name shown in the image?",
        "Can you read the name of the establishment in the image?",
        "What name is mentioned for the establishment in the image?",
        "Is the name of the establishment visible in this image? What is it?"
    ]
    return general_questions
5.4 创建 Hugging Face 数据集
在这里,我们定义一个为 Hugging Face 创建数据集的函数。它获取图像-问题-答案对的列表,并按照 Hugging Face 库所需的格式组织它们。
def create_huggingface_dataset(dataset_rows):
    """
    Creates a Hugging Face dataset from a list of examples, ensuring the dataset structure
    matches the expected format with appropriate feature types.

    Args:
        dataset_rows (list of dict): A list of dictionaries where each dictionary contains
                                          the keys 'image', 'question', and 'answer'. The 'image'
                                          value should be a PIL Image object, and 'question'
                                          and 'answer' should be strings.

    Returns:
        datasets.Dataset: A Hugging Face Dataset object containing the images, questions, and
                          answers from the provided examples, with the specified feature types.
    """
    features = datasets.Features({
        'image': datasets.Image(),
        'question': datasets.Value('string'),
        'answer': datasets.Value('string')
    })

    return datasets.Dataset.from_dict({
        "image": [example["image"] for example in dataset_rows],
        "question": [example["question"] for example in dataset_rows],
        "answer": [example["answer"] for example in dataset_rows]
    }, features=features)
5.5 安装 Google Drive
要访问存储在 Google Drive 上的图片,我们需要安装该驱动器并对 Hugging Face 进行身份验证:
!huggingface-cli login --token $HF_TOKEN --add-to-git-credential
drive.mount('/content/drive')
5.6 加载图片
现在,我们从 Google Drive 中的指定文件夹加载所有图片。我们检查文件扩展名以确保只处理有效的图片格式(例如 .png、.jpg、.jpeg)。
image_dict = {}

# Iterate over all files in the folder
for file_name in os.listdir(IMAGE_FOLDER_PATH):
    # Check if the file is a supported image format
    if file_name.lower().endswith(('.png', '.jpg', '.jpeg')):
        # Remove the file extension from the name
        establishment_name = os.path.splitext(file_name)[0]
        # Load the image using PIL
        image_path = os.path.join(IMAGE_FOLDER_PATH, file_name)
        image = Image.open(image_path)
        image = ImageOps.exif_transpose(image)
        # Add to the dictionary
        image_dict[establishment_name] = image
# Example: display the number of loaded images
print(f"Number of images loaded: {len(image_dict)}")
image_dict
5.7 创建数据集行
在此步骤中,我们创建数据集行。对于每幅图像,我们从生成的问题列表中随机选择一个问题,并将相应的机构名称关联为答案。
dataset_rows = []

for establishment_name, image in image_dict.items():
  # Generate a list of questions for each image
  image_questions = generate_image_questions()
  # Create a dictionary for the row
  row = {
      "image": image,
      "question": random.choice(image_questions),
      "answer": establishment_name
  }
  # Append the row to the dataset list
  dataset_rows.append(row)
# Display the dataset rows
dataset_rows
5.8 可视化数据集
我们可以可视化数据集中的特定条目,以验证数据集的结构和内容。
# Example: Access a specific index (41 in this case) from the dataset
idx = 41
print(custom_dataset)
print(custom_dataset[idx]['question'])
print(custom_dataset[idx]['answer'])
custom_dataset[idx]['image']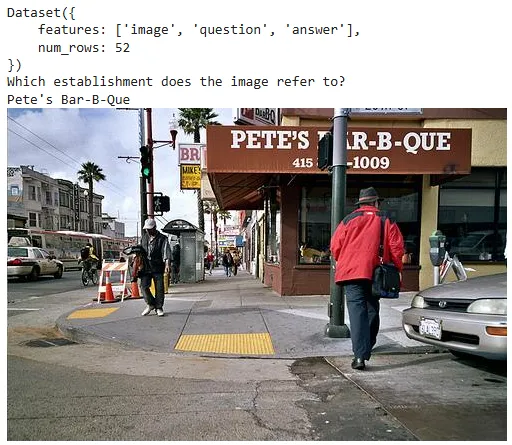
5.9 拆分数据集
现在,我们将数据集拆分为训练集和验证集,其中 80% 用于训练,20% 用于验证。然后,为了清晰起见,我们将拆分重命名为“训练”和“验证”。
# Split the dataset 80% for training, 20% for validation
combined_dataset_split = custom_dataset.train_test_split(test_size=0.2)

# Rename the splits to 'train' and 'validation'
split_dataset = datasets.DatasetDict({
    'train': combined_dataset_split['train'],
    'validation': combined_dataset_split['test']
})
# Output the number of rows in each split
print(f"Training set: {len(split_dataset['train'])} rows")
print(f"Validation set: {len(split_dataset['validation'])} rows")
6、Google Colab QLoRA 微调代码
微调过程是在 Google Colab 上使用 T4 GPU 执行的。
6.1 安装依赖项
首先,安装所需的库。
!pip install -q -U datasets bitsandbytes peft git+https://github.com/huggingface/transformers.git6.2 导入库
我们导入加载数据集、处理图像、训练模型和使用 QLoRA 所需的库。
from datasets import load_dataset, concatenate_datasets
from PIL import Image
import torch
from transformers import BitsAndBytesConfig, Trainer, TrainingArguments, PaliGemmaProcessor, AutoProcessor, PaliGemmaForConditionalGeneration
from peft import get_peft_model, LoraConfig
import os
6.3 验证 Hugging Face
使用令牌登录 Hugging Face 以访问私有模型或数据集并获得写入权限。
!huggingface-cli login --token $HF_TOKEN --add-to-git-credential6.4 设置参数
我们定义模型设置、数据集路径和输出目录的参数:
device = "cuda"  # Use GPU for training
model_id = "google/paligemma2-3b-pt-224"  # Pre-trained model identifier
dataset_path = "bernardomota/establishment-name-vqa"  # Custom dataset path
model_output = "paligemma2-qlora-st-vqa-estnamevqa-224"  # Output directory for the trained model
6.5 定义图像预处理
resize_and_process 函数将图像大小调整为最大 640px,同时保持宽高比。
def resize_and_process(batch):
    """
    Resize images in the batch if necessary and return the updated batch.
    Args:
        batch (dict): A dictionary containing images and potentially other data.
    Returns:
        dict: The updated batch with resized images.
    """
    max_size = 640
    images = batch['image']
    # Resize each image in the batch
    resized_images = []
    for img in images:
        width, height = img.size
        if max(width, height) > max_size:
            resize_ratio = max_size / max(width, height)
            new_width = int(width * resize_ratio)
            new_height = int(height * resize_ratio)
            img = img.resize((new_width, new_height), Image.LANCZOS)
        resized_images.append(img)
    batch['image'] = resized_images

    return batch
6.6 加载和预处理数据集
我们加载自定义数据集,将其拆分为训练集和验证集,并应用图像预处理函数:
ds_custom = load_dataset(dataset_path, trust_remote_code=True)
train_ds_custom = ds_custom["train"]
val_ds_custom = ds_custom["validation"]
train_ds_custom = train_ds_custom.map(resize_and_process, batched=True)
val_ds_custom = val_ds_custom.map(resize_and_process, batched=True)
print(train_ds_custom)
print(val_ds_custom)
我们还利用了一个名为 ST-VQA 的公共 VQA 数据集,可在 Hugging Face 的“vikhyatk/st-vqa”上找到。由于我们的自定义数据集相对较小,因此该数据集将补充我们的微调过程。通过整合 ST-VQA,我们旨在增强模型的性能和泛化能力。为了便于处理,我们仅使用了 10% 的数据集。
# Function to process 'qas' and return expanded rows
def process_qas(examples):
    # Flatten the qas list and extract questions, answers, and images efficiently
    questions = [qa['question'] for qas_list in examples['qas'] for qa in qas_list]
    answers = [qa['answers'][-1] for qas_list in examples['qas'] for qa in qas_list]
    images = [image for image, qas_list in zip(examples['image'], examples['qas']) for _ in qas_list]

    return {'question': questions, 'image': images, 'answer': answers}

ds_stvqa = load_dataset('vikhyatk/st-vqa')['train']
ds_stvqa_sample = ds_stvqa.train_test_split(test_size=0.9)['train']
ds_stvqa_formatted = ds_stvqa_sample.map(process_qas, batched=True, remove_columns=['qas'])

# Split the dataset 90% for training, 10% for validation
ds_stvqa_formatted_split = ds_stvqa_formatted.train_test_split(test_size=0.1)

train_ds_stvqa = ds_stvqa_formatted_split['train']
val_ds_stvqa = ds_stvqa_formatted_split['test']
train_ds_stvqa = train_ds_stvqa.map(resize_and_process, batched=True)
val_ds_stvqa = val_ds_stvqa.map(resize_and_process, batched=True)
print(train_ds_stvqa)
print(val_ds_stvqa)

train_ds = concatenate_datasets([train_ds_custom, train_ds_stvqa])
val_ds = concatenate_datasets([val_ds_custom, val_ds_stvqa])
print(train_ds)
print(val_ds)

idx = -1
print(train_ds[idx])
train_ds[idx]['image']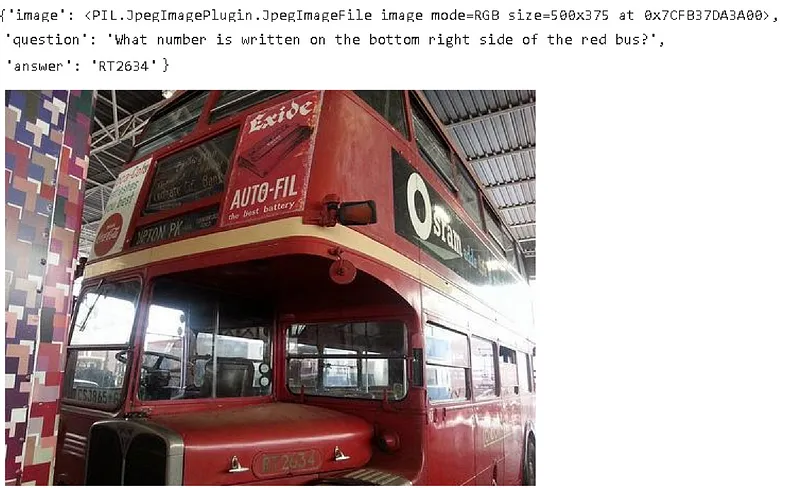
6.7 初始化处理器
我们初始化 PaliGemmaProcessor 进行标记化和图像预处理,供模型使用。
processor = PaliGemmaProcessor.from_pretrained(model_id)6.8 配置BitsAndBytes(4 位量化)
为了使用量化权重高效地加载模型,我们使用 BitsAndBytes 配置进行 4 位量化:
bnb_config = BitsAndBytesConfig(
        load_in_4bit=True,
        bnb_4bit_quant_type="nf4",
        bnb_4bit_compute_type=torch.bfloat16
)
6.9 配置 LoRA 进行微调
我们配置 LoRA(低秩自适应)来微调模型的特定模块,使该过程节省内存。
lora_config = LoraConfig(
    r=8,
    target_modules=["q_proj", "o_proj", "k_proj", "v_proj", "gate_proj", "up_proj", "down_proj"],
    task_type="CAUSAL_LM",
)
6.10 加载预训练模型并应用 QLoRA
我们加载 PaliGemmaForConditionalGeneration 模型,应用量化配置并集成 QLoRA:
model = PaliGemmaForConditionalGeneration.from_pretrained(
    model_id,
    quantization_config=bnb_config,
    device_map={"": 0},
    torch_dtype=torch.bfloat16
)
model = get_peft_model(model, lora_config)
model.print_trainable_parameters()
6.11 定义训练参数
我们定义微调过程的 TrainingArguments,包括批次大小、学习率、时期数和其他设置:
args = TrainingArguments(
    num_train_epochs=1,
    remove_unused_columns=False,
    per_device_train_batch_size=2,
    gradient_accumulation_steps=8,
    warmup_steps=2,
    learning_rate=2e-5,
    weight_decay=1e-6,
    adam_beta2=0.999,
    logging_steps=100,
    optim="paged_adamw_8bit",  # Optimizer choice
    save_strategy="steps",
    save_steps=1000,
    save_total_limit=1,
    bf16=True,
    output_dir=model_output,
    report_to=["tensorboard"],
    dataloader_pin_memory=False
)
6.12 创建整理函数
我们定义一个 collate_fn 函数来准备训练的批量数据。此函数确保模型获得正确的输入格式。
def collate_fn(examples):
    texts = ["answer " + example["question"] for example in examples]
    labels = [example['answer'] for example in examples]
    images = [example["image"].convert("RGB") for example in examples]

    # Process the inputs (questions and images) using the processor
    tokens = processor(
        text=texts, images=images, suffix=labels,
        return_tensors="pt", padding="longest",
        input_data_format="channels_last"
    )
    tokens = tokens.to(DTYPE).to(device)

    return tokens
6.13 训练模型
我们初始化 Trainer 类,指定模型、训练参数和数据集。然后,我们调用 train() 方法开始微调:
trainer = Trainer(
    model=model,
    train_dataset=train_ds,
    eval_dataset=val_ds,
    data_collator=collate_fn,
    args=args
)
trainer.train()
这完成了使用 QLoRA 对 PaliGemma2 模型进行微调的设置。该模型经过训练,可以在场景中执行文本识别,例如图像中的机构名称,使用视觉和文本信息,以节省内存的方式进行量化和 LoRA。
6.14 验证微调模型
最后,验证微调模型以确认其性能符合预期:
from transformers.image_utils import load_image

model_id = "bernardomota/paligemma2-qlora-st-vqa-estnamevqa-224"
model = PaliGemmaForConditionalGeneration.from_pretrained(model_id)
processor = AutoProcessor.from_pretrained("google/paligemma2-3b-pt-224")

url = "https://itajaishopping.com.br/wp-content/uploads/2023/02/burgerking-itajai-shopping.jpg"
image = load_image(url)
image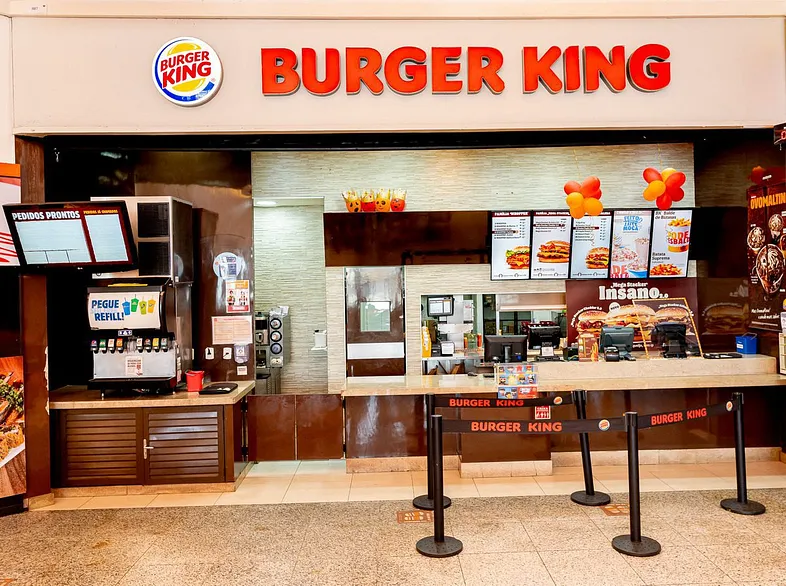
# Leaving the prompt blank for pre-trained models
prompt = "What is the name of the establishment?"
model_inputs = processor(text=prompt, images=image, return_tensors="pt").to(torch.bfloat16).to(model.device)
input_len = model_inputs["input_ids"].shape[-1]

with torch.inference_mode():
    generation = model.generate(**model_inputs, max_new_tokens=100, do_sample=False)
    generation = generation[0][input_len:]
    decoded = processor.decode(generation, skip_special_tokens=True)
print(decoded)答案是:汉堡王。看来它成功了!完整代码可在此处找到
7、结束语:选择哪种工作流程?
传统 OCR、OCR + LLM 或多模态模型之间的选择取决于手头的业务问题:
- 传统 OCR:最适合计算成本是重要制约因素的简单问题。它为简单的文本提取任务提供了快速且经济高效的解决方案。
- OCR + LLM:非常适合需要更高程度文本理解的中级问题。这种方法在基本 OCR 功能中添加了上下文理解,提供了更细致入微的见解。
- 多模态模型:对于需要以综合方式理解文本和图像的复杂场景,这是最佳选择。这些模型在解释视觉元素和文本信息之间的上下文和语义关系方面脱颖而出,尽管计算成本较高。
PaliGemma2 模型展示了多模态架构的强大功能,为需要精确解释图像中文本信息的任务提供了定制解决方案。通过使用自定义数据集(例如知名的 VQA)对 PaliGemma2 进行微调,可以在高度特定的任务上实现最先进的性能,以连续且可扩展的方式弥合文本和视觉理解之间的差距。
汇智网翻译整理,转载请标明出处
