SAM 2 自定义数据集微调
虽然 SAM 2 开箱即用,但它在罕见或特定领域的任务上的表现可能并不总是符合预期。微调允许你根据特定需求调整 SAM2,从而提高其针对特定用例的准确性和效率。

Meta 的 Segment Anything Model 2 (SAM 2) 是分割技术的最新创新。它是 Meta 的第一个统一模型,可以实时分割图像和视频中的对象。
但是,如果 SAM 2 已经可以分割任何东西,为什么还要对其进行微调呢?
虽然 SAM 2 开箱即用,功能强大,但它在罕见或特定领域的任务上的表现可能并不总是符合预期。微调允许你根据特定需求调整 SAM2,从而提高其针对特定用例的准确性和效率。
在本文中,我将逐步指导你完成 SAM 2 的微调过程。
1、SAM 2
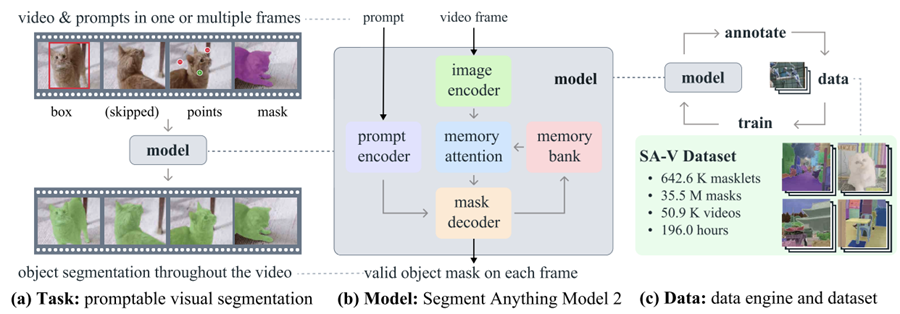
SAM 2 是 Meta 为图像和视频中的可提示视觉分割而开发的基础模型。与其前身 SAM 主要关注静态图像不同,SAM 2 还旨在处理视频分割的复杂性。

它采用了具有流内存的转换器架构,可实现实时视频处理。SAM 2 的训练涉及一个庞大而多样的数据集,其中包括新颖的 SA-V 数据集,其中包括 51,000 个视频的 600,000 多个 masklet 注释。
它的数据引擎允许交互式数据收集和模型改进,使模型能够对任何可能的内容进行分割。该引擎使 SAM 2 能够不断学习和适应,使其能够更有效地处理新的具有挑战性的数据。但是,对于特定领域的任务或稀有对象,微调对于实现最佳性能至关重要。
2、为什么要微调 SAM2?
在 SAM 2 的背景下,微调是在特定数据集上进一步训练预训练的 SAM 2 模型以增强其在特定任务或领域的性能的过程。虽然 SAM 2 是一款在广泛而多样的数据集上训练的强大工具,但其通用性可能并不总是能为专门或罕见的任务带来最佳结果。
例如,如果你正在开展需要识别特定肿瘤类型的医学成像项目,则由于模型的通用训练,其性能可能会不足。

微调 SAM 2 解决了这一限制,允许你根据特定数据集调整模型。此过程提高了模型的准确性,并使其更有效地满足你的独特用例。
以下是微调 SAM 2 的主要优势:
- 提高准确性:通过针对特定数据集微调模型,您可以显著提高其准确性,确保在目标应用程序中获得更好的性能。
- 专门的分割:微调使模型能够熟练地分割与您的项目相关的特定对象类型、视觉样式或环境,从而提供通用模型可能无法实现的定制结果。
- 效率:微调通常比从头开始训练模型更有效。它通常需要更少的数据和时间,使其成为快速将模型适应新任务或小众任务的实用解决方案。
3、开始微调 SAM 2:先决条件
要开始微调 SAM 2,需要满足以下先决条件:
- 访问 SAM 2 模型和代码库:可以访问 SAM 2 模型及其代码库。您可以从 Meta 的 GitHub 存储库下载预先训练的 SAM 2 模型。
- 合适的数据集:你需要一个包含基准真实分割蒙版的数据集。在本教程中,我们将使用胸部 CT 分割数据集,你可以下载并准备进行训练。
- 计算资源:微调 SAM 2 需要具有足够计算能力的硬件。强烈建议使用 GPU 来确保该过程高效且易于管理,尤其是在处理大型数据集或复杂模型时。在此示例中,使用了 Google Colab 上的 A100 GPU。
软件和其他要求:
- Python 3.11 或更高版本
- PyTorch
- OpenCV:使用
!pip install opencv-python安装
4、准备用于微调 SAM 2 的数据集
数据集的质量对于微调 SAM 2 模型至关重要。具有精确分割掩码的高质量标注图像或视频对于实现最佳性能至关重要。精确的标注使模型能够学习正确的特征,从而在实际应用中实现更好的分割准确性和稳健性。
4.1 数据采集
第一步涉及获取数据集,这是训练过程的支柱。我们的数据来自 Kaggle,这是一个提供各种数据集的可靠平台。使用 Kaggle API,我们以所需的格式下载数据,确保图像和相应的分割掩码随时可供进一步处理。
4.2 数据提取和清理
下载数据集后,我们执行了以下步骤:
- 解压和清理:Extr从下载的 zip 文件中处理数据并删除不必要的文件以节省磁盘空间。
- ID 提取:提取图像和掩码的唯一标识符 (ID),以确保在训练期间它们之间正确映射。
- 删除不必要的文件:删除任何嘈杂或不相关的文件,例如某些已知问题的图像,以保持数据集的完整性。
4.3 转换为可用格式
由于 SAM2 模型需要特定格式的输入,我们将数据转换如下:
- DICOM 到 NumPy:读取 DICOM 图像并将其存储为 NumPy 数组,然后将其调整为 512x512 像素的标准尺寸。
- NRRD 到 NumPy 用于掩码:同样,包含肺、心脏和气管掩码的 NRRD 文件被处理并保存为 NumPy 数组。然后重新调整这些掩码以匹配相应的图像。
- 转换为 JPG/PNG:为了获得更好的可视化和兼容性,NumPy 数组被转换为 JPG/PNG 格式。此步骤包括对图像强度值进行标准化,并确保蒙版的方向正确。
4.4 保存和组织数据
然后将处理后的图像和蒙版组织到相应的文件夹中,以便在微调过程中轻松访问。此外,这些图像和蒙版的路径被写入 CSV 文件 (train.csv),以方便在训练期间加载数据。
4.5 可视化和验证
最后一步涉及验证数据集以确保其准确性:
- 可视化:我们通过将蒙版叠加在图像上来可视化图像蒙版对。这有助于我们检查蒙版的对齐和准确性。
- 检查:通过检查一些样本,我们可以确认数据集已正确准备并可用于微调。
这里有一个快速笔记本,可带你了解数据集创建的代码。你可以按照此数据创建路径进行操作,也可以直接使用任何在线可用的数据集,其格式与先决条件中提到的格式相同。
5、微调 SAM2
Segment Anything Model 2 包含多个组件,但为了实现更快的微调,这里的关键是只训练轻量级组件,例如掩码解码器和提示编码器,而不是整个模型。微调此模型的步骤如下:
5.1 安装 SAM-2
要开始微调过程,我们需要安装 SAM-2 库,这对于 Segment Anything Model (SAM2) 至关重要。该模型旨在有效处理各种分割任务。安装涉及从 GitHub 克隆 SAM-2 存储库并安装必要的依赖项。
!git clone https://github.com/facebookresearch/segment-anything-2
%cd /content/segment-anything-2
!pip install -q -e .
此代码片段确保 SAM2 库已正确安装并准备好用于我们的微调工作流程。
5.2 下载数据集
安装 SAM-2 库后,下一步是获取我们将用于微调的数据集。我们使用 Kaggle 上提供的数据集,特别是胸部 CT 分割数据集,其中包含肺部、心脏和气管的图像和掩模。
数据集包含:
- images.zip:RGB 格式的图像
- masks.zip:RGB 格式的分割掩模
- train.csv:带有图像名称的 CSV 文件

在此博客中,我们将仅使用肺部图像和掩模进行分割。Kaggle API 允许我们将数据集直接下载到我们的环境中。我们首先从 Kaggle 上传 kaggle.json 文件以轻松访问任何数据集。
要获取 kaggle.json,请转到用户个人资料下的“设置”选项卡并选择“创建新令牌”。这将触发 Kaggle 下载.json,这是一个包含你的 API 凭证的文件。
# get dataset from Kaggle
from google.colab import files
files.upload()  # This will prompt you to upload the kaggle.json file

!mkdir -p ~/.kaggle
!mv kaggle.json ~/.kaggle/
!chmod 600 ~/.kaggle/kaggle.json
!kaggle datasets download -d polomarco/chest-ct-segmentation
解压缩数据:
!unzip chest-ct-segmentation.zip -d chest-ct-segmentation准备好数据集后,让我们开始微调过程。正如我之前提到的,这里的关键是只微调 SAM2 的轻量级组件,例如掩码解码器和提示编码器,而不是整个模型。这种方法更高效,需要的资源更少。
5.3 下载 SAM-2 检查点
对于微调过程,我们需要从预先训练的 SAM2 模型权重开始。这些权重称为“检查点”,是进一步训练的起点。检查点已在各种图像上进行了训练,通过在我们的特定数据集上对它们进行微调,我们可以在目标任务上取得更好的表现。
!wget -O sam2_hiera_tiny.pt "https://dl.fbaipublicfiles.com/segment_anything_2/072824/sam2_hiera_tiny.pt"
!wget -O sam2_hiera_small.pt "https://dl.fbaipublicfiles.com/segment_anything_2/072824/sam2_hiera_small.pt"
!wget -O sam2_hiera_base_plus.pt "https://dl.fbaipublicfiles.com/segment_anything_2/072824/sam2_hiera_base_plus.pt"
!wget -O sam2_hiera_large.pt "https://dl.fbaipublicfiles.com/segment_anything_2/072824/sam2_hiera_large.pt"
在此步骤中,我们下载与不同模型大小(例如,tiny、small、base_plus、large)相对应的各种 SAM-2 检查点。可以根据可用的计算资源和手头的具体任务调整检查点的选择。
5.4 数据准备
下载数据集后,下一步是准备进行训练。这涉及将数据集拆分为训练集和测试集,并创建可在微调期间输入到 SAM 2 模型中的数据结构。
%cd /content/segment-anything-2

import os
import pandas as pd
import cv2
import torch
import torch.nn.utils
import numpy as np
import matplotlib.pyplot as plt
import matplotlib.colors as mcolors
from sklearn.model_selection import train_test_split
from sam2.build_sam import build_sam2
from sam2.sam2_image_predictor import SAM2ImagePredictor

# Path to the chest-ct-segmentation dataset folder
data_dir = "/content/segment-anything-2/chest-ct-segmentation"
images_dir = os.path.join(data_dir, "images/images")
masks_dir = os.path.join(data_dir, "masks/masks")

# Load the train.csv file
train_df = pd.read_csv(os.path.join(data_dir, "train.csv"))

# Split the data into two halves: one for training and one for testing
train_df, test_df = train_test_split(train_df, test_size=0.2, random_state=42)

# Prepare the training data list
train_data = []
for index, row in train_df.iterrows():
   image_name = row['ImageId']
   mask_name = row['MaskId']

   # Append image and corresponding mask paths
   train_data.append({
       "image": os.path.join(images_dir, image_name),
       "annotation": os.path.join(masks_dir, mask_name)
   })

# Prepare the testing data list (if needed for inference or evaluation later)
test_data = []
for index, row in test_df.iterrows():
   image_name = row['ImageId']
   mask_name = row['MaskId']

   # Append image and corresponding mask paths
   test_data.append({
       "image": os.path.join(images_dir, image_name),
       "annotation": os.path.join(masks_dir, mask_name)
   })
我们将数据集分成训练集 (80%) 和测试集 (20%),以确保我们能够在训练后评估模型的性能。训练数据将用于微调 SAM 2 模型,而测试数据将用于推理和评估。
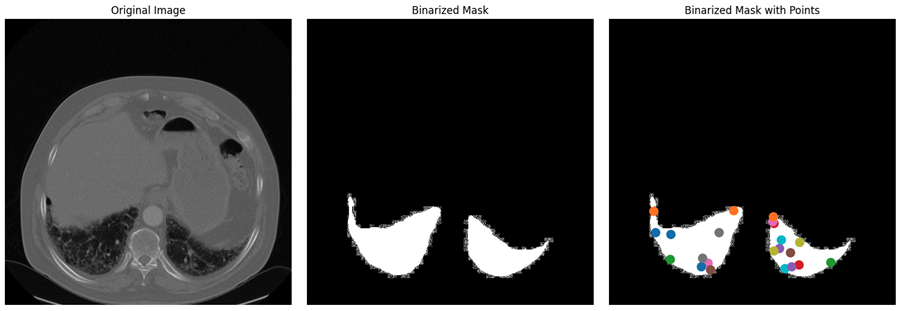
将数据集分成训练集和测试集后,下一步是创建二进制掩码、选择这些掩码中的关键点并可视化这些元素以确保正确处理数据。
读取和调整图像大小:该过程从随机从数据集中选择图像及其对应的掩码开始。图像从 BGR 格式转换为 RGB 格式,这是大多数深度学习模型的标准颜色格式。相应的注释(掩码)以灰度模式读取。然后,将图像和注释掩码都调整为最大尺寸 1024 像素,保持纵横比以确保数据符合模型的输入要求并减少计算负荷。
def read_batch(data, visualize_data=False):
   # Select a random entry
   ent = data[np.random.randint(len(data))]

   # Get full paths
   Img = cv2.imread(ent["image"])[..., ::-1]  # Convert BGR to RGB
   ann_map = cv2.imread(ent["annotation"], cv2.IMREAD_GRAYSCALE)  # Read annotation as grayscale

   if Img is None or ann_map is None:
       print(f"Error: Could not read image or mask from path {ent['image']} or {ent['annotation']}")
       return None, None, None, 0

   # Resize image and mask
   r = np.min([1024 / Img.shape[1], 1024 / Img.shape[0]])  # Scaling factor
   Img = cv2.resize(Img, (int(Img.shape[1] * r), int(Img.shape[0] * r)))
   ann_map = cv2.resize(ann_map, (int(ann_map.shape[1] * r), int(ann_map.shape[0] * r)), interpolation=cv2.INTER_NEAREST)
分割掩码的二值化:将多类注释掩码(可能具有用不同像素值标记的多个对象类)转换为二值掩码。此掩码突出显示图像中所有感兴趣的区域,将分割任务简化为二元分类问题:对象与背景。然后使用 5x5 内核腐蚀二值掩码。
腐蚀会略微减小掩码的大小,这有助于避免选择点时的边界效应。这可确保所选点位于对象内部,而不是靠近其边缘,因为边缘可能会很嘈杂或模糊。
从腐蚀掩码中选择关键点。这些点在微调过程中充当提示,指导模型将注意力集中在哪里。这些点是从对象内部随机选择的,以确保它们具有代表性且不受嘈杂边界的影响。
   ### Continuation of read_batch() ###

   # Initialize a single binary mask
   binary_mask = np.zeros_like(ann_map, dtype=np.uint8)
   points = []

   # Get binary masks and combine them into a single mask
   inds = np.unique(ann_map)[1:]  # Skip the background (index 0)
   for ind in inds:
       mask = (ann_map == ind).astype(np.uint8)  # Create binary mask for each unique index
       binary_mask = np.maximum(binary_mask, mask)  # Combine with the existing binary mask

   # Erode the combined binary mask to avoid boundary points
   eroded_mask = cv2.erode(binary_mask, np.ones((5, 5), np.uint8), iterations=1)

   # Get all coordinates inside the eroded mask and choose a random point
   coords = np.argwhere(eroded_mask > 0)
   if len(coords) > 0:
       for _ in inds:  # Select as many points as there are unique labels
           yx = np.array(coords[np.random.randint(len(coords))])
           points.append([yx[1], yx[0]])

   points = np.array(points)
可视化:此步骤对于验证数据预处理步骤是否正确执行至关重要。通过目视检查二值化掩码上的点,可以确保模型在训练期间会收到适当的输入。最后,对二值掩码进行重新整形和格式化(尺寸适合模型输入),并且点也进行重新整形以供在训练过程中进一步使用。该函数返回处理后的图像、二值掩码、选定的点以及找到的掩码数量。
    ### Continuation of read_batch() ###

    if visualize_data:
        # Plotting the images and points
        plt.figure(figsize=(15, 5))

        # Original Image
        plt.subplot(1, 3, 1)
        plt.title('Original Image')
        plt.imshow(img)
        plt.axis('off')

        # Segmentation Mask (binary_mask)
        plt.subplot(1, 3, 2)
        plt.title('Binarized Mask')
        plt.imshow(binary_mask, cmap='gray')
        plt.axis('off')

        # Mask with Points in Different Colors
        plt.subplot(1, 3, 3)
        plt.title('Binarized Mask with Points')
        plt.imshow(binary_mask, cmap='gray')

        # Plot points in different colors
        colors = list(mcolors.TABLEAU_COLORS.values())
        for i, point in enumerate(points):
            plt.scatter(point[0], point[1], c=colors[i % len(colors)], s=100, label=f'Point {i+1}')  # Corrected to plot y, x order

        # plt.legend()
        plt.axis('off')

        plt.tight_layout()
        plt.show()

    binary_mask = np.expand_dims(binary_mask, axis=-1)  # Now shape is (1024, 1024, 1)
    binary_mask = binary_mask.transpose((2, 0, 1))
    points = np.expand_dims(points, axis=1)

    # Return the image, binarized mask, points, and number of masks
    return img, binary_mask, points, len(inds)

# Visualize the data
Img1, masks1, points1, num_masks = read_batch(train_data, visualize_data=True)
上述代码返回下图,其中包含来自数据集的原始图像及其二值化掩码和带点的二值化掩码。

5.5 微调 SAM2 模型
微调 SAM2 模型涉及几个步骤,包括加载模型、设置优化器和调度程序,以及根据训练数据迭代更新模型权重。
加载模型检查点:
sam2_checkpoint = "sam2_hiera_small.pt"  # @param ["sam2_hiera_tiny.pt", "sam2_hiera_small.pt", "sam2_hiera_base_plus.pt", "sam2_hiera_large.pt"]
model_cfg = "sam2_hiera_s.yaml" # @param ["sam2_hiera_t.yaml", "sam2_hiera_s.yaml", "sam2_hiera_b+.yaml", "sam2_hiera_l.yaml"]

sam2_model = build_sam2(model_cfg, sam2_checkpoint, device="cuda")
predictor = SAM2ImagePredictor(sam2_model)
我们首先使用预训练的检查点构建 SAM2 模型。然后将模型包装在预测器类中,这简化了设置图像、编码提示和解码掩码的过程。
配置超参数:
我们配置了几个超参数以确保模型有效学习,例如学习率、权重衰减和梯度累积步骤。这些超参数控制学习过程,包括模型更新权重的速度以及如何避免过度拟合。请随意尝试这些。
# Train mask decoder.
predictor.model.sam_mask_decoder.train(True)

# Train prompt encoder.
predictor.model.sam_prompt_encoder.train(True)

# Configure optimizer.
optimizer=torch.optim.AdamW(params=predictor.model.parameters(),lr=0.0001,weight_decay=1e-4) #1e-5, weight_decay = 4e-5

# Mix precision.
scaler = torch.cuda.amp.GradScaler()

# No. of steps to train the model.
NO_OF_STEPS = 3000 # @param

# Fine-tuned model name.
FINE_TUNED_MODEL_NAME = "fine_tuned_sam2"
优化器负责更新模型权重,而调度器则在训练期间调整学习率以提高收敛性。通过微调这些参数,我们可以实现更好的分割精度。
开始训练:
实际的微调过程是迭代的,其中在每个步骤中,一批仅用于肺部的图像和掩模通过模型,并计算损失并用于更新模型权重。
# Initialize scheduler
scheduler = torch.optim.lr_scheduler.StepLR(optimizer, step_size=500, gamma=0.2) # 500 , 250, gamma = 0.1
accumulation_steps = 4  # Number of steps to accumulate gradients before updating

for step in range(1, NO_OF_STEPS + 1):
   with torch.cuda.amp.autocast():
       image, mask, input_point, num_masks = read_batch(train_data, visualize_data=False)
       if image is None or mask is None or num_masks == 0:
           continue

       input_label = np.ones((num_masks, 1))
       if not isinstance(input_point, np.ndarray) or not isinstance(input_label, np.ndarray):
           continue

       if input_point.size == 0 or input_label.size == 0:
           continue

       predictor.set_image(image)
       mask_input, unnorm_coords, labels, unnorm_box = predictor._prep_prompts(input_point, input_label, box=None, mask_logits=None, normalize_coords=True)
       if unnorm_coords is None or labels is None or unnorm_coords.shape[0] == 0 or labels.shape[0] == 0:
           continue

       sparse_embeddings, dense_embeddings = predictor.model.sam_prompt_encoder(
           points=(unnorm_coords, labels), boxes=None, masks=None,
       )

       batched_mode = unnorm_coords.shape[0] > 1
       high_res_features = [feat_level[-1].unsqueeze(0) for feat_level in predictor._features["high_res_feats"]]
       low_res_masks, prd_scores, _, _ = predictor.model.sam_mask_decoder(
           image_embeddings=predictor._features["image_embed"][-1].unsqueeze(0),
           image_pe=predictor.model.sam_prompt_encoder.get_dense_pe(),
           sparse_prompt_embeddings=sparse_embeddings,
           dense_prompt_embeddings=dense_embeddings,
           multimask_output=True,
           repeat_image=batched_mode,
           high_res_features=high_res_features,
       )
       prd_masks = predictor._transforms.postprocess_masks(low_res_masks, predictor._orig_hw[-1])

       gt_mask = torch.tensor(mask.astype(np.float32)).cuda()
       prd_mask = torch.sigmoid(prd_masks[:, 0])
       seg_loss = (-gt_mask * torch.log(prd_mask + 0.000001) - (1 - gt_mask) * torch.log((1 - prd_mask) + 0.00001)).mean()

       inter = (gt_mask * (prd_mask > 0.5)).sum(1).sum(1)
       iou = inter / (gt_mask.sum(1).sum(1) + (prd_mask > 0.5).sum(1).sum(1) - inter)
       score_loss = torch.abs(prd_scores[:, 0] - iou).mean()
       loss = seg_loss + score_loss * 0.05

       # Apply gradient accumulation
       loss = loss / accumulation_steps
       scaler.scale(loss).backward()

       # Clip gradients
       torch.nn.utils.clip_grad_norm_(predictor.model.parameters(), max_norm=1.0)

       if step % accumulation_steps == 0:
           scaler.step(optimizer)
           scaler.update()
           predictor.model.zero_grad()

       # Update scheduler
       scheduler.step()

       if step % 500 == 0:
           FINE_TUNED_MODEL = FINE_TUNED_MODEL_NAME + "_" + str(step) + ".torch"
           torch.save(predictor.model.state_dict(), FINE_TUNED_MODEL)

       if step == 1:
           mean_iou = 0

       mean_iou = mean_iou * 0.99 + 0.01 * np.mean(iou.cpu().detach().numpy())

       if step % 100 == 0:
           print("Step " + str(step) + ":\t", "Accuracy (IoU) = ", mean_iou)
在每次迭代过程中,模型都会处理一批图像,计算分割掩码,并将它们与基本事实进行比较以计算损失。然后,该损失用于调整模型权重,逐步提高模型的性能。经过大约 3000 个时期的训练,我们获得了大约 72% 的准确率(IoU - 交集比并集)。
5.6 使用微调后的模型进行推理
然后,该模型可用于推理,预测新的、未见过的图像上的分割掩码。从 read_images 和 get_points 辅助函数开始,获取推理图像及其掩码以及关键点。
def read_image(image_path, mask_path):  # read and resize image and mask
   img = cv2.imread(image_path)[..., ::-1]  # Convert BGR to RGB
   mask = cv2.imread(mask_path, 0)
   r = np.min([1024 / img.shape[1], 1024 / img.shape[0]])
   img = cv2.resize(img, (int(img.shape[1] * r), int(img.shape[0] * r)))
   mask = cv2.resize(mask, (int(mask.shape[1] * r), int(mask.shape[0] * r)), interpolation=cv2.INTER_NEAREST)
   return img, mask

def get_points(mask, num_points):  # Sample points inside the input mask
   points = []
   coords = np.argwhere(mask > 0)
   for i in range(num_points):
       yx = np.array(coords[np.random.randint(len(coords))])
       points.append([[yx[1], yx[0]]])
   return np.array(points)
然后加载你想要进行推理的样本图像以及新微调的权重,并执行推理设置 torch.no_grad()。
# Randomly select a test image from the test_data
selected_entry = random.choice(test_data)
image_path = selected_entry['image']
mask_path = selected_entry['annotation']

# Load the selected image and mask
image, mask = read_image(image_path, mask_path)

# Generate random points for the input
num_samples = 30  # Number of points per segment to sample
input_points = get_points(mask, num_samples)

# Load the fine-tuned model
FINE_TUNED_MODEL_WEIGHTS = "fine_tuned_sam2_1000.torch"
sam2_model = build_sam2(model_cfg, sam2_checkpoint, device="cuda")

# Build net and load weights
predictor = SAM2ImagePredictor(sam2_model)
predictor.model.load_state_dict(torch.load(FINE_TUNED_MODEL_WEIGHTS))

# Perform inference and predict masks
with torch.no_grad():
   predictor.set_image(image)
   masks, scores, logits = predictor.predict(
       point_coords=input_points,
       point_labels=np.ones([input_points.shape[0], 1])
   )

# Process the predicted masks and sort by scores
np_masks = np.array(masks[:, 0])
np_scores = scores[:, 0]
sorted_masks = np_masks[np.argsort(np_scores)][::-1]

# Initialize segmentation map and occupancy mask
seg_map = np.zeros_like(sorted_masks[0], dtype=np.uint8)
occupancy_mask = np.zeros_like(sorted_masks[0], dtype=bool)

# Combine masks to create the final segmentation map
for i in range(sorted_masks.shape[0]):
   mask = sorted_masks[i]
   if (mask * occupancy_mask).sum() / mask.sum() > 0.15:
       continue

   mask_bool = mask.astype(bool)
   mask_bool[occupancy_mask] = False  # Set overlapping areas to False in the mask
   seg_map[mask_bool] = i + 1  # Use boolean mask to index seg_map
   occupancy_mask[mask_bool] = True  # Update occupancy_mask

# Visualization: Show the original image, mask, and final segmentation side by side
plt.figure(figsize=(18, 6))

plt.subplot(1, 3, 1)
plt.title('Test Image')
plt.imshow(image)
plt.axis('off')

plt.subplot(1, 3, 2)
plt.title('Original Mask')
plt.imshow(mask, cmap='gray')
plt.axis('off')

plt.subplot(1, 3, 3)
plt.title('Final Segmentation')
plt.imshow(seg_map, cmap='jet')
plt.axis('off')

plt.tight_layout()
plt.show()
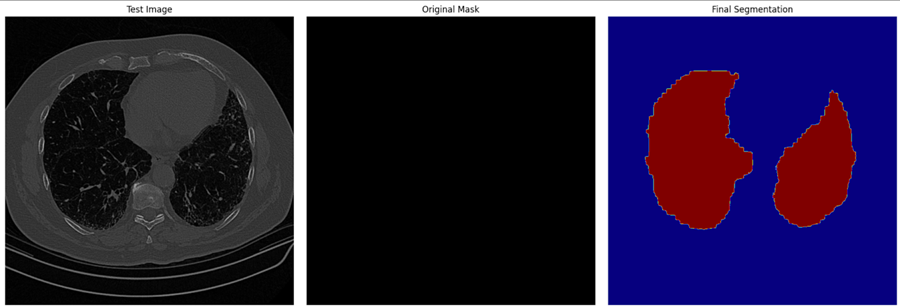
在此步骤中,我们使用微调模型为测试图像生成分割蒙版。然后将预测蒙版与原始图像和地面实况蒙版一起可视化,以评估模型的性能。

6、结束语
微调 SAM2 提供了一种实用的方法来增强其特定任务的能力。无论你从事医学成像、自动驾驶汽车还是视频编辑,微调都可以让你根据自己的独特需求使用 SAM2。按照本指南,你可以根据项目调整 SAM2 并获得最先进的分割结果。
对于更高级的用例,请考虑微调 SAM2 的其他组件,例如图像编码器。虽然这需要更多资源,但它提供了更大的灵活性和性能改进。
原文链接:Fine-Tuning SAM 2 on a Custom Dataset: Tutorial
汇智网翻译整理,转载请标明出处
