用Gemini自动规划货船配载
Gemini 2.5 Pro 实验版通过提示工程实现了自动化货船配载规划,克服了先前模型的局限性。这消除了对复杂算法的需求,展示了人工智能在物流领域的潜力。

最近,我遇到了一个实际的业务挑战:通过人工智能实现配载规划的自动化。具体来说,我收到了生成货船最优集装箱装载计划的请求,这项任务传统上需要大量的手动工作和领域专业知识。
在Gemini 2.5发布之前进行的初步测试中,我发现现有模型难以有效处理这一问题的复杂性,包括重量分布、集装箱尺寸和目的地排序等约束条件。然而,随着Gemini 2.5的发布,我观察到模型的能力有了显著提升。
利用Gemini 2.5 Pro 实验版模型,我成功地通过精心设计的提示生成了可行的配载计划。这一突破消除了对复杂定制算法或大规模训练数据集的需求。成功的实施涉及向模型提供关键参数,如集装箱尺寸、重量、目的港和船舶容量。
本报告详细介绍了使用Gemini 2.5 Pro 实验版创建自动化配载规划的方法、提示工程以及结果,突显其在物流和航运运营中革命性潜力。
1、获取API密钥
为了使用本报告中的脚本,请使用你的API密钥。参考链接此API密钥用于访问Gemini API。
2、主脚本
我使用Python进行了测试。主脚本非常简单,如下所示。函数createPrompt()返回包含提示的contents值。该函数将在下一节中展示。
import json
from google import genai
from google.genai.types import Part

contents = createPrompt()

client = genai.Client(api_key="###") # 请设置您的API密钥。

response = client.models.generate_content(
    model="models/gemini-2.5-pro-exp-03-25",
    contents=contents,
    config={"response_mime_type": "application/json"},
)
print(response.text)
3、提示
函数createPrompt()如下:
def createPrompt():
    # 请设置参考数据文件的路径和文件名。
    ref_file_name = "./sampleRefFile.pdf"

with open(ref_file_name, "rb") as f:
        ref_file = f.read()
    json_schema_for_stowage_area = {
        "description": "JSON模式用于托盘。",
        "type": "object",
        "properties": {
            "xWidth": {
                "type": "number",
                "description": "托盘宽度。单位为米。这是x轴方向。",
            },
            "yLength": {
                "type": "number",
                "description": "托盘长度。托盘沿yLength方向移动。单位为米。这是y轴方向。",
            },
            "maxWeight": {
                "type": "number",
                "description": "托盘的最大承载能力。单位为千克。",
            },
            "directionOfTravel": {
                "type": "string",
                "description": "行驶方向。",
            },
        },
        "required": ["xWidth", "yLength", "maxWeight", "directionOfTravel"],
    }
    json_schema_for_containers = {
        "description": "JSON模式用于集装箱。每个ID都必须与jsonSchemaForOutput一起使用。",
        "type": "array",
        "items": {
            "type": "object",
            "properties": {
                "xWidth": {
                    "type": "number",
                    "description": "集装箱宽度。单位为米。",
                },
                "yLength": {
                    "type": "number",
                    "description": "集装箱长度。单位为米。",
                },
                "zHeight": {
                    "type": "number",
                    "description": "集装箱高度。单位为米。",
                },
                "weight": {
                    "type": "number",
                    "description": "集装箱重量。单位为千克。",
                },
                "id": {
                    "type": "string",
                    "description": "此值是集装箱ID。放置时需要使用此ID。",
                },
            },
            "required": ["xWidth", "yLength", "zHeight", "weight", "id"],
        },
    }
    json_schema_for_output = {
        "description": "输出数据的JSON模式。托盘和集装箱的坐标原点位于底部角落。",
        "type": "object",
        "properties": {
            "containers": {
                "type": "array",
                "items": {
                    "type": "object",
                    "properties": {
                        "x": {
                            "type": "number",
                            "description": "X坐标。单位为米。",
                        },
                        "y": {
                            "type": "number",
                            "description": "Y坐标。单位为米。",
                        },
                        "z": {
                            "type": "number",
                            "description": "Z坐标。单位为米。",
                        },
                        "rotate90": {
                            "type": "boolean",
                            "description": "当此集装箱需要旋转90度时,设置为'true'。",
                        },
                        "id": {
                            "type": "string",
                            "description": "集装箱ID。此ID必须与'Containers'的ID相对应。",
                        },
                    },
                    "required": ["x", "y", "z", "rotate90", "id"],
                },
            },
            "centerOfGravity": {
                "type": "object",
                "description": "计算重心。",
                "properties": {
                    "x": {
                        "type": "number",
                        "description": "X坐标。单位为米。",
                    },
                    "y": {
                        "type": "number",
                        "description": "Y坐标。单位为米。",
                    },
                    "z": {
                        "type": "number",
                        "description": "Z坐标。单位为米。",
                    },
                },
                "required": ["x", "y", "z"],
            },
            "required": ["containers", "centerOfGravity"],
        },
    }
    json_schema_for_error = {
        "description": "错误的JSON模式。当所有集装箱都无法放置时,以包含错误原因的消息形式返回错误消息。",
        "type": "object",
        "properties": {
            "errorMessage": {"type": "string", "description": "错误消息。"},
            "required": ["errorMessage"],
        },
    }
    prompts = [
        f"返回适合平台上的集装箱的装载计划。为此,请按以下步骤操作。",
        f"1. 理解以下集装箱和平台。",
        f"集装箱",
        f"<Containers>{json.dumps(containers)}</Containers>",
        f'集装箱的JSON模式如下。',
        f"<jsonSchemaForContainers>{json.dumps(json_schema_for_containers)}</jsonSchemaForContainers>",
        f"平台",
        f"<Platform>{json.dumps(stowage_area)}</Platform>",
        f'平台的JSON模式如下。',
        f"<jsonSchemaForPlatform>{json.dumps(json_schema_for_stowage_area)}</jsonSchemaForPlatform>",
        f"所有集装箱都必须被放置。如果无法放置所有集装箱,则返回 `<JSONSchemaForError>{json.dumps(json_schema_for_error)}</JSONSchemaForError>`。",
        "装载计划的条件。",
        "<ConditionOfLoadingPlan>",
        "装载表面:矩形,平坦",
        "装载限制:无(本次未考虑)",
        "装载计划",
        "装载计划显示容器在坐标中的放置情况。例如,如果平台中心为原点 (0, 0),x轴对应长度,y轴对应宽度,则会如下所示:",
        "必须避免在集装箱之间产生间隙。",
        "较重的集装箱需要放在底部。较轻的集装箱需要放在较重的集装箱上。",
        "</ConditionOfLoadingPlan>",
        '2. 使用以下 JSON 模式返回结果。请考虑 "IMPORTANT"。',
        "<JSONSchemaForOutputFormat>{json.dumps(json_schema_for_output)}</JSONSchemaForOutputFormat>",
        '<IMPORTANT>通过参考上传的文件 "{ref_file_name}" 来生成结果。</IMPORTANT>',
    ]
    return [
        "\n".join(prompts),
        Part.from_bytes(data=ref_file, mime_type="application/pdf"),
    ]
这里,文件 ./sampleRefFile.pdf 如下所示。我使用了这些数据作为输出值的参考。

4、测试
示例 1
关于 stowage_area 和 containers 的值,当使用以下值时,
stowage_area = {
    "xWidth": 3,
    "yLength": 6,
    "maxWeight": 100,
    "directionOfTravel": "yLength",
}
containers = [
    {"xWidth": 3, "yLength": 3, "zHeight": 1, "weight": 9, "id": "sample1"},
    {"xWidth": 3, "yLength": 3, "zHeight": 1, "weight": 9, "id": "sample2"},
    {"xWidth": 2, "yLength": 3, "zHeight": 1, "weight": 6, "id": "sample3"},
    {"xWidth": 2, "yLength": 3, "zHeight": 1, "weight": 6, "id": "sample4"},
    {"xWidth": 2, "yLength": 3, "zHeight": 1, "weight": 6, "id": "sample5"},
]
得到以下结果:
{
  "containers": [
    { "x": 0, "y": 0, "z": 0, "rotate90": false, "id": "sample1" },
    { "x": 0, "y": 3, "z": 0, "rotate90": false, "id": "sample2" },
    { "x": 0, "y": 0, "z": 1, "rotate90": true, "id": "sample3" },
    { "x": 0, "y": 2, "z": 1, "rotate90": true, "id": "sample4" },
    { "x": 0, "y": 4, "z": 1, "rotate90": true, "id": "sample5" }
  ],
  "centerOfGravity": { "x": 1.5, "y": 3, "z": 1 }
}
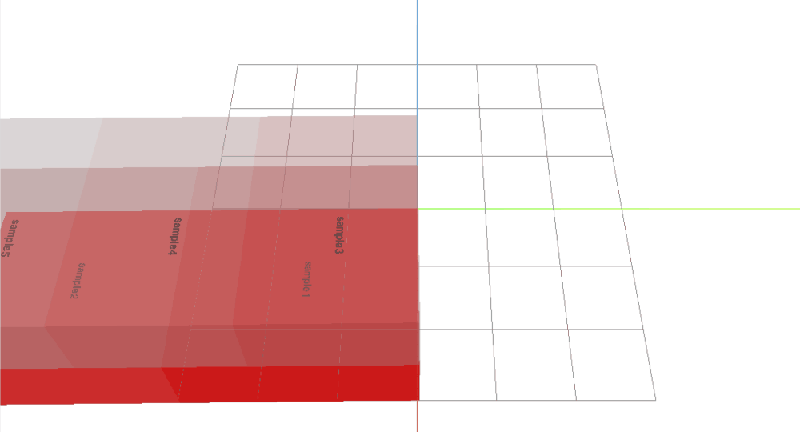
当此结果以 3D 图像显示时,如下所示。
示例 2
关于 stowage_area 和 containers 的值,当使用以下值时,
stowage_area = { xWidth: 3, yLength: 3, maxWeight: 100, directionOfTravel: "yLength" }
containers = [
  { xWidth: 2, yLength: 3, zHeight: 1, weight: 1, id: "sample1" },
  { xWidth: 1, yLength: 3, zHeight: 1, weight: 1, id: "sample2" },
  { xWidth: 2, yLength: 2, zHeight: 1, weight: 1, id: "sample3" },
  { xWidth: 1, yLength: 1, zHeight: 1, weight: 2, id: "sample4" },
  { xWidth: 1, yLength: 2, zHeight: 1, weight: 2, id: "sample5" },
  { xWidth: 2, yLength: 1, zHeight: 1, weight: 2, id: "sample6" },
]
得到以下结果:
{
  "containers": [
    { "x": 0, "y": 0, "z": 0, "rotate90": false, "id": "sample6" },
    { "x": 2, "y": 0, "z": 0, "rotate90": false, "id": "sample4" },
    { "x": 0, "y": 1, "z": 0, "rotate90": false, "id": "sample5" },
    { "x": 1, "y": 1, "z": 0, "rotate90": false, "id": "sample3" },
    { "x": 0, "y": 0, "z": 1, "rotate90": false, "id": "sample1" },
    { "x": 2, "y": 0, "z": 1, "rotate90": false, "id": "sample2" }
  ],
  "centerOfGravity": { "x": 1.5, "y": 1.222, "z": 0.722 }
}
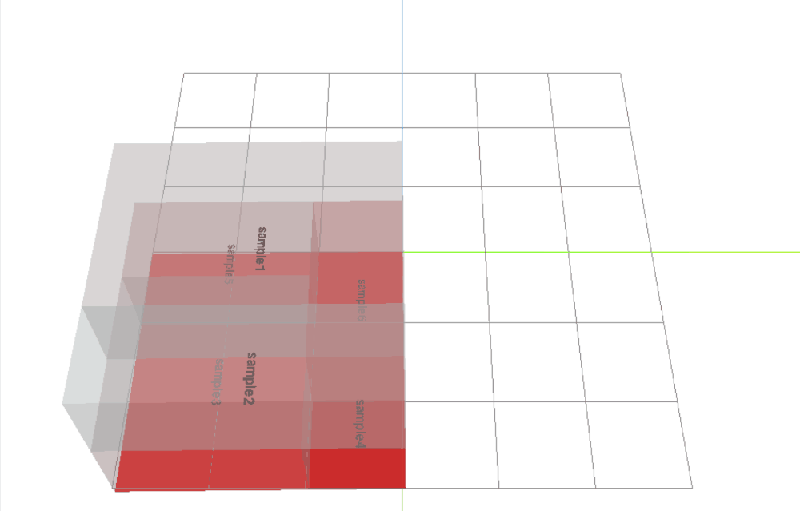
当此结果以 3D 图像显示时,如下所示。
示例 3
关于 stowage_area 和 containers 的值,当使用以下值时,
stowage_area = { xWidth: 6, yLength: 10, maxWeight: 100, directionOfTravel: "yLength" }
containers = [
  { xWidth: 3, yLength: 5, zHeight: 1, weight: 1, id: "sample1" },
  { xWidth: 3, yLength: 6, zHeight: 1, weight: 1, id: "sample2" },
  { xWidth: 3, yLength: 3, zHeight: 1, weight: 1, id: "sample3" },
  { xWidth: 2, yLength: 3, zHeight: 1, weight: 1, id: "sample4" },
  { xWidth: 2, yLength: 6, zHeight: 1, weight: 1, id: "sample5" },
  { xWidth: 3, yLength: 3, zHeight: 1, weight: 2, id: "sample6" },
  { xWidth: 3, yLength: 3, zHeight: 1, weight: 2, id: "sample7" },
  { xWidth: 3, yLength: 3, zHeight: 1, weight: 2, id: "sample8" },
  { xWidth: 3, yLength: 3, zHeight: 1, weight: 2, id: "sample9" },
  { xWidth: 3, yLength: 4, zHeight: 1, weight: 2, id: "sample10" },
  { xWidth: 3, yLength: 4, zHeight: 1, weight: 2, id: "sample11" },
]
得到以下结果:
{
  "containers": [
    { "x": 0, "y": 0, "z": 0, "rotate90": false, "id": "sample10" },
    { "x": 3, "y": 0, "z": 0, "rotate90": false, "id": "sample11" },
    { "x": 0, "y": 4, "z": 0, "rotate90": false, "id": "sample6" },
    { "x": 3, "y": 4, "z": 0, "rotate90": false, "id": "sample7" },
    { "x": 0, "y": 7, "z": 0, "rotate90": false, "id": "sample8" },
    { "x": 3, "y": 7, "z": 0, "rotate90": false, "id": "sample9" },
    { "x": 0, "y": 0, "z": 1, "rotate90": true, "id": "sample2" },
    { "x": 0, "y": 3, "z": 1, "rotate90": true, "id": "sample5" },
    { "x": 0, "y": 5, "z": 1, "rotate90": false, "id": "sample1" },
    { "x": 3, "y": 5, "z": 1, "rotate90": false, "id": "sample3" },
    { "x": 3, "y": 8, "z": 1, "rotate90": true, "id": "sample4" }
  ],
  "centerOfGravity": { "x": 3.088, "y": 5.441, "z": 0.794 }
}
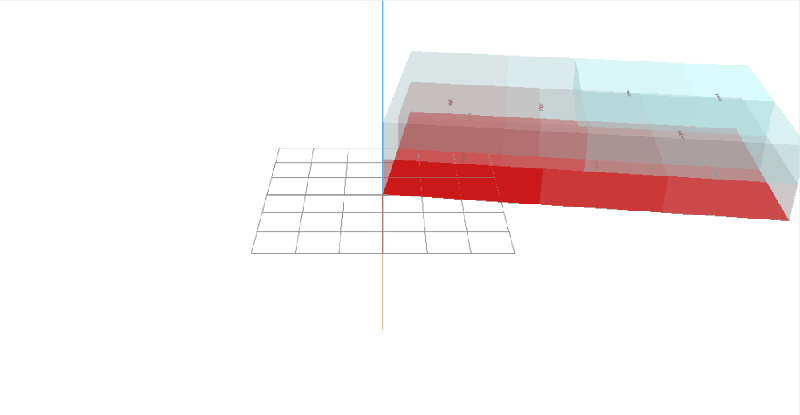
当此结果以 3D 图像显示时,如下所示。
5、结束语
通过 Gemini 2.5 Pro Experimental 的提示工程,证明了自动化货船配载规划的可行性。成功地通过提供集装箱尺寸、重量、目的港和船容量等关键参数生成了可行的配载计划。
原文链接:Stowage Planning Automation Using Gemini: A Feasibility Study and A Prompt-Based Approach
汇智网翻译整理,转载请标明出处