视觉语言模型LoRA微调指南
在本文中,我们将探讨如何使用Unsloth、WandB等强大的工具组合来微调 Meta AI 的 Llama-3.2–11B-Vision 模型,并使用vLLM进行模型服务和推理。

视觉语言模型 (VLM) 在 AI 领域中变得至关重要,使系统能够处理和理解各种任务的图像和文本。关键应用包括图像字幕、视觉问答、文档理解和 OCR(从图像中读取文本)。这些任务对于依赖高质量视觉和文本分析的行业(例如电子商务、医疗保健和金融)至关重要。现在有各种强大的开源多模态模型,尤其是能够处理各种任务的 VLM。一些领先的模型包括:
- LLaVa 和 LLava-NeXT
- Pixtral-12B
- Llama-3.2–11B-Vision
- Qwen2-VL
- Molmo
虽然这些预先训练的多模态模型通常提供了强大的基础,并且对于图像字幕和文档理解等一般任务很有效,因为它们已经从大型、多样化的数据集中学习了模式,但在您自己的数据集上对这些模型进行微调可以进一步提高它们在更具体的应用中的性能。微调必不可少的一些场景包括:
- 领域适应
- 任务专业化
- 资源优化
- 文化和区域背景
通过调整模型以更好地满足任务的独特需求,微调可以提高目标应用的准确性和效率。
在本文中,我们将探讨如何使用多种强大的工具组合来微调 Meta AI 的 Llama-3.2–11B-Vision 模型。我们将利用 Unsloth 进行高效的模型加载和训练,利用 LoRA 进行优化的参数更新,并集成权重和偏差 (WandB) 以实现无缝实验跟踪。微调后,我们可以使用 vLLM 进行模型服务和推理,确保高性能部署。
1、工具和技术概述
本文使用的主要工具和技术包括:
Unsloth:
- 用于微调视觉语言模型 (VLM) 和大型语言模型 (LLM) 的优化框架,提供高达 30 倍的训练速度,同时减少 60% 的内存使用量。
- 支持多种硬件设置,包括 NVIDIA、AMD 和 Intel GPU,并采用智能权重优化技术来提高内存效率。
LoRA(低秩自适应):
- 一种高效微调技术,可避免修改所有模型参数。
- 向模型添加小型可训练层,以进行特定于任务的自适应。
- 降低 GPU 内存要求,可在标准硬件上使用。
- 非常适合平衡资源效率和微调性能。
权重和偏差 (W&B):
- 用于监控训练指标、管理实验和可视化性能的跟踪工具。
- 确保可重复性和跨团队协作。
2、环境设置
首先安装所需的库:
!pip install torch==2.5.1 transformers==4.46.2 datasets wandb huggingface_hub python-dotenv --no-cache-dir | tail -n 1
!pip uninstall unsloth -y && pip install --upgrade --no-cache-dir "unsloth[colab-new] @ git+https://github.com/unslothai/unsloth.git"
!pip install --no-deps trl peft accelerate bitsandbytes xformers==0.0.28.post3 --no-cache | tail -n 1
然后设置WandB。
为了监控微调过程并跟踪不同的实验,我们将使用权重和偏差 (W&B)。这可让您自动记录训练进度(包括损失曲线)、可视化指标、比较模型版本以及跟踪模型随时间的性能。
import os
import wandb
from dotenv import load_dotenv
load_dotenv()

def setup_wandb(project_name: str, run_name: str):
    # Set up your API KEY
    try:
        api_key = os.getenv("WANDB_API_KEY")
        wandb.login(key=api_key)
        print("Successfully logged into WandB.")
    except KeyError:
        raise EnvironmentError("WANDB_API_KEY is not set in the environment variables.")
    except Exception as e:
        print(f"Error logging into WandB: {e}")

    # Optional: Log models
    os.environ["WANDB_LOG_MODEL"] = "checkpoint"
    os.environ["WANDB_WATCH"] = "all"
    os.environ["WANDB_SILENT"] = "true"

    # Initialize the WandB run
    try:
        wandb.init(project=project_name, name=run_name)
        print(f"WandB run initialized: Project - {project_name}, Run - {run_name}")
    except Exception as e:
        print(f"Error initializing WandB run: {e}")

# Setup Weights & Biases
setup_wandb(project_name="<project_name>", run_name="<run_name>")
接下来设置HuggingFace 身份验证。
在微调我们的模型后,我们将把它上传到 Hugging Face Hub。为此,我们首先需要通过检索和验证我们的 Hugging Face 令牌来进行身份验证。此令牌授予上传模型和与 Hugging Face 资源交互的权限。我们将在本文后面介绍上传过程。
from huggingface_hub import login

hf_token = os.getenv("HUGGINGFACE_TOKEN")
if hf_token is None:
    raise EnvironmentError("HUGGINGFACE_TOKEN is not set in the environment variables.")
login(hf_token)
3、准备用于训练的数据集
对于我们的训练,我们将使用 HuggingFaceM4/the_cauldron 数据集,具体来说,这是 geomverse 的子集,是为涉及几何问题解决和使用图像和文本进行数学推理的多模态任务而设计的。每个样本都包含一张说明几何问题的图像,并配有问题的文本描述和分步解决方案。这使得它非常适合需要整合图像和文本来解决问题的多模态模型。
为了使微调过程更加高效,我们将从数据集中选择 3,000 个样本的子集,而不是使用完整的训练分割。这种方法使我们能够减少计算开销,同时快速评估模型的性能。
from datasets import load_dataset
from PIL import Image

# Loading the dataset
dataset_id = "HuggingFaceM4/the_cauldron"
subset = "geomverse"
dataset = load_dataset(dataset_id, subset, split="train")

# Selecting a subset of 3K samples for fine-tuning
dataset = dataset.select(range(3000))
print(f"Using a sample size of {len(dataset)} for fine-tuning.")
print(dataset)
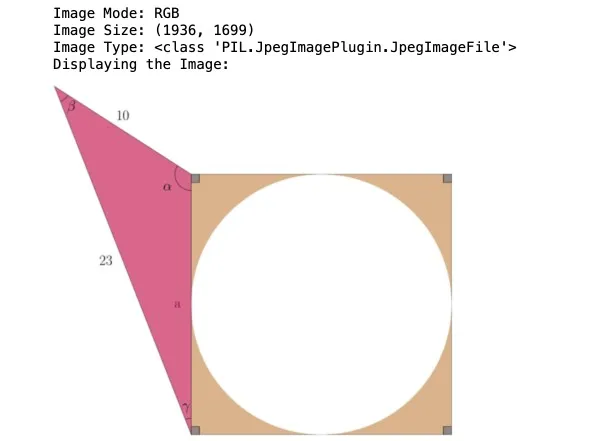
现在,让我们查看数据集中的第 5 个样本,检查其文本和图像内容。
dataset[5]
为了更好地理解数据集中的图像数据,我们可以检查其属性。以下是我们如何检索图像的模式、大小和类型:
# Print the mode of the image in dataset[5]
print(f"Image Mode: {dataset[5]['images'][0].mode}")

# Print the size of the image in dataset[5]
print(f"Image Size: {dataset[5]['images'][0].size}")

# Print the type of the image in dataset[5]
print(f"Image Type: {type(dataset[5]['images'][0])}")

# Display the image - dataset[5]["images"][0].show()
print("Displaying the Image:")
small_image = dataset[5]["images"][0].copy()  # Create a copy to avoid modifying the original
small_image.thumbnail((400, 400))             # Resize to fit within 400x400 pixels
small_image.show()
在本节中,我们定义了用于图像预处理的实用函数,以优化训练数据并将数据集构造为正确的格式:
convert_to_rgb:
- 确保所有图像均为 RGB 格式。
- 通过在白色背景上合成来处理 alpha 通道。
reduce_image_size:
- 将图像调整为较小的比例,增强内存和计算效率。
format_data:
- 通过组合文本和图像数据来构造数据集。
- 将每个样本组织成“用户”和“助手”角色。
- 准备数据集以微调用于多模式任务的对话模型。
这种结构化方法可确保无缝训练处理文本和图像输入的模型。

def convert_to_rgb(image):
    """Convert image to RGB format if not already in RGB."""
    if image.mode == "RGB":
        return image
    image_rgba = image.convert("RGBA")
    background = Image.new("RGBA", image_rgba.size, (255, 255, 255))
    alpha_composite = Image.alpha_composite(background, image_rgba)
    return alpha_composite.convert("RGB")


def reduce_image_size(image, scale=0.5):
    """Reduce image size by a given scale."""
    original_width, original_height = image.size
    new_width = int(original_width * scale)
    new_height = int(original_height * scale)
    return image.resize((new_width, new_height))


def format_data(sample):
    """Format the dataset sample into structured messages."""
    image = sample["images"][0]
    image = convert_to_rgb(image)
    image = reduce_image_size(image)

    return {
        "messages": [
            {
                "role": "user",
                "content": [
                    {
                        "type": "text",
                        "text": sample["texts"][0]["user"],
                    },
                    {
                        "type": "image",
                        "image": image,
                    }
                ],
            },
            {
                "role": "assistant",
                "content": [
                    {
                        "type": "text",
                        "text": sample["texts"][0]["assistant"],
                    }
                ],
            },
        ],
    }


# Transform the dataset
converted_dataset = [format_data(sample) for sample in dataset]
现在,让我们看看应用上述操作后转换后的数据是什么样子转换。
converted_dataset[5]
4、加载我们的视觉模型
此设置使用 Unsloth 的 FastVisionModel 初始化 Llama-3.2–11B-Vision-Instruct 模型,参数如下:
- 梯度检查点 (
use_gradient_checkpointing="unsloth")
显著减少内存使用量,特别适用于处理长上下文序列。
- 量化 (
load_in_4bit=False):
保持默认的 16 位精度 (LoRA) 以获得更好的准确性,但可以设置 4 位量化 (QLoRA) 以节省内存。
import torch
from unsloth import FastVisionModel

model_name = "unsloth/Llama-3.2-11B-Vision-Instruct"

model, tokenizer = FastVisionModel.from_pretrained(
    model_name = model_name,
    load_in_4bit = False,                     # Use 4bit to reduce memory use. False for 16bit LoRA.
    use_gradient_checkpointing = "unsloth",   # True or "unsloth" for long context
)
你可以使用其他模型,例如:
- unsloth/Qwen2-VL-7B-Instruct
- unsloth/Pixtral-12B-2409
- unsloth/llava-v1.6-mistral-7b-hf
只需根据你的要求将代码中的模型名称替换为以下选项之一即可。
要查看受支持模型的完整列表,请参阅此处。
5、配置 LoRA 进行参数高效微调
在本节中,我们配置 LoRA(低秩自适应)进行参数高效微调,通过仅关注模型的关键部分而不是微调所有参数来优化训练并减少内存使用。以下是关键参数的细分:
- finetune_vision_layers=True:启用视觉层的微调,允许专门适应视觉任务。
- finetune_language_layers=True:启用语言层的微调,调整与语言相关的任务的模型。
- finetune_attention_modules=True:启用注意层的微调,帮助模型专注于输入序列的重要部分。
- finetune_mlp_modules=True:允许微调 MLP 层,这对于转换模型内的表示至关重要。
- r=8:设置 LoRA 矩阵的秩,通过控制层的低秩近似来平衡模型性能和内存效率。
- lora_alpha=16:LoRA 的比例因子,用于控制低秩矩阵对模型最终权重的影响程度。
- lora_dropout=0:将 dropout 率设置为零,以进行一致训练,而不会在训练期间引入随机性。
- bias=”none”:指定在微调期间不使用其他偏差项。
- random_state=3407:通过固定随机种子确保训练可重现。
- use_rslora=False:禁用等级敏感的 LoRA,选择标准 LoRA 配置,该配置效率更高,但可能无法很好地捕获复杂模式。
- loftq_config=None:禁用 LoftQ,这是一种高级初始化方法,可提高准确性,但在开始时会增加内存使用量。
此配置允许对选定层进行有效微调,优化任务模型,同时最大限度地减少计算开销。
model = FastVisionModel.get_peft_model(
    model,
    finetune_vision_layers     = True, # False if not finetuning vision layers
    finetune_language_layers   = True, # False if not finetuning language layers
    finetune_attention_modules = True, # False if not finetuning attention layers
    finetune_mlp_modules       = True, # False if not finetuning MLP layers
    r = 8,
    lora_alpha = 16,
    lora_dropout = 0,
    bias = "none",
    random_state = 3407,
    use_rslora = False,
    loftq_config = None
)
6、评估基础视觉模型
在进行任何微调之前,让我们先检查原始模型的性能。我们将利用 TextStreamer 类来流式传输生成的文本输出,从而实现实时响应流式传输。
FastVisionModel.for_inference(model)         # Enable for inference!

image = dataset[5]["images"][0]
instruction = dataset[5]["texts"][0]["user"]

messages = [
    {
        "role": "user",
        "content": [
            {
                "type": "image",
            },
            {
                "type": "text",
                "text": instruction
            },
        ]
    }
]

input_text = tokenizer.apply_chat_template(messages, add_generation_prompt = True)
inputs = tokenizer(
    image,
    input_text,
    add_special_tokens = False,
    return_tensors = "pt",
).to("cuda")
from transformers import TextStreamer
text_streamer = TextStreamer(tokenizer, skip_prompt = True)
_ = model.generate(**inputs, streamer = text_streamer, max_new_tokens = 1024,
use_cache = True, temperature = 1.5, min_p = 0.1)你会观察到,尽管模型正确地解释了形状,但数学和几何推理不正确,导致答案过长,输出不正确,并出现一些幻觉迹象。
我们使用 Unsloth 的 kaggle 笔记本中提到的 min_p = 0.1 和 temperature = 1.5。有关更多信息,请参阅此推文。
7、使用 SFTTrainer 和 Unsloth 进行训练
此代码使用 trl 库中的 SFTTrainer 配置并启动视觉模型的训练过程。它首先通过 SFTConfig 设置超参数,包括批量大小、学习率和优化器设置,同时根据硬件支持启用混合精度训练。然后使用 FastVisionModel.for_training() 准备模型进行训练。训练器使用模型、标记器和自定义数据整理器( UnslothVisionDataCollator)进行初始化,以进行视觉微调。此设置可确保多模式任务(尤其是基于视觉的模型)的高效训练、资源管理和日志记录。
from trl import SFTTrainer, SFTConfig
from unsloth import is_bf16_supported
from unsloth.trainer import UnslothVisionDataCollator

args = SFTConfig(
        per_device_train_batch_size = 2, # Controls the batch size per device
        gradient_accumulation_steps = 4, # Accumulates gradients to simulate a larger batch
        warmup_steps = 5,
        num_train_epochs = 3,            # Number of training epochs
        learning_rate = 2e-4,            # Sets the learning rate for optimization
        fp16 = not is_bf16_supported(),
        bf16 = is_bf16_supported(),
        optim = "adamw_8bit",
        weight_decay = 0.01,            # Regularization term for preventing overfitting
        lr_scheduler_type = "linear",   # Chooses a linear learning rate decay
        seed = 3407,
        output_dir = "outputs",
        report_to = "wandb",            # Enables WandB logging
        logging_steps = 1,              # Sets frequency of logging
        logging_strategy = "steps",
        save_strategy = "no",
        load_best_model_at_end = True,
        save_only_model = False,
        # You MUST put the below items for vision finetuning:
        remove_unused_columns = False,
        dataset_text_field = "",
        dataset_kwargs = {"skip_prepare_dataset": True},
        dataset_num_proc = 4,
        max_seq_length = 2048,
    )
FastVisionModel.for_training(model) # Enable for training!
trainer = SFTTrainer(
model = model,
tokenizer = tokenizer,
data_collator = UnslothVisionDataCollator(model, tokenizer), # Must use!
train_dataset = converted_dataset,
args = args,
)此代码在训练开始时捕获初始 GPU 内存统计数据。
# Show current memory stats
gpu_stats = torch.cuda.get_device_properties(0)
start_gpu_memory = round(torch.cuda.max_memory_reserved() / 1024 / 1024 / 1024, 3)
max_memory = round(gpu_stats.total_memory / 1024 / 1024 / 1024, 3)
print(f"GPU = {gpu_stats.name}. Max memory = {max_memory} GB.")
print(f"{start_gpu_memory} GB of memory reserved.")
现在我们已经完成了设置,让我们开始训练我们的模型。
trainer_stats = trainer.train()
print(trainer_stats)

wandb.finish()
训练过程结束后,以下代码检查并比较最终内存使用情况,捕获专门用于 LoRA 训练的内存并计算内存百分比。
# Show final memory and time stats
used_memory = round(torch.cuda.max_memory_reserved() / 1024 / 1024 / 1024, 3)
used_memory_for_lora = round(used_memory - start_gpu_memory, 3)
used_percentage = round(used_memory         /max_memory*100, 3)
lora_percentage = round(used_memory_for_lora/max_memory*100, 3)
print(f"{trainer_stats.metrics['train_runtime']} seconds used for training.")
print(f"{round(trainer_stats.metrics['train_runtime']/60, 2)} minutes used for training.")
print(f"Peak reserved memory = {used_memory} GB.")
print(f"Peak reserved memory for training = {used_memory_for_lora} GB.")
print(f"Peak reserved memory % of max memory = {used_percentage} %.")
print(f"Peak reserved memory for training % of max memory = {lora_percentage} %.")
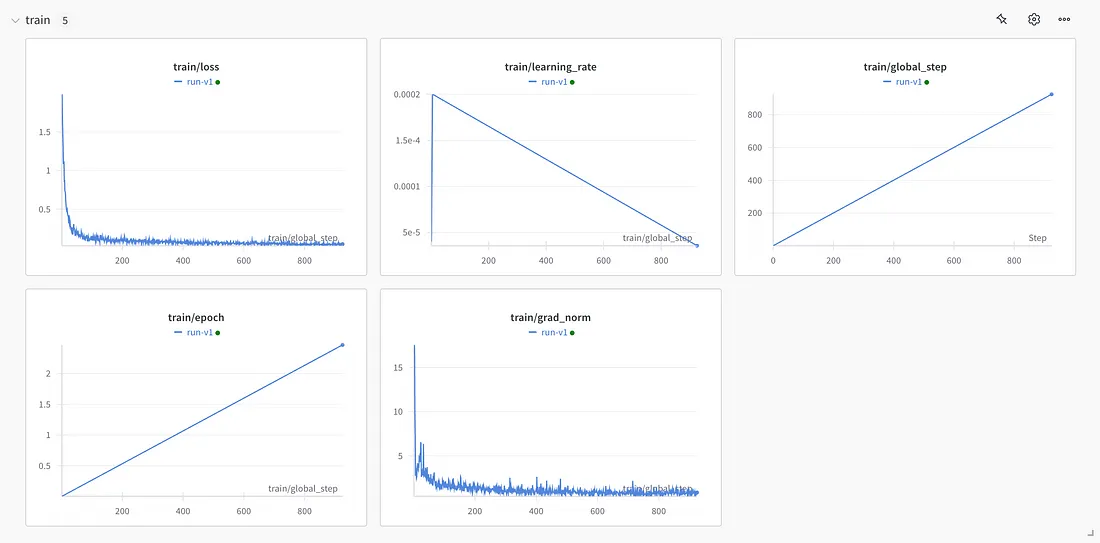
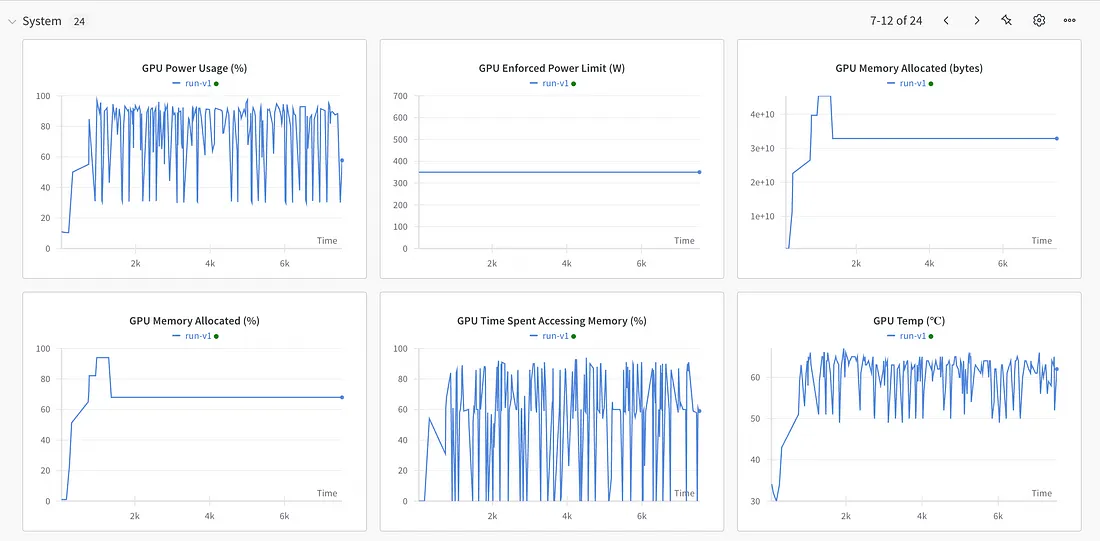
我们可以在 WandB 上可视化训练指标和系统指标,例如内存使用情况、训练时长、训练损失和准确性等,以更好地了解我们模型随时间的性能。


8、保存和部署模型
在对视觉语言模型进行微调后,训练后的模型将保存在本地并上传到 Hugging Face Hub,以便于访问和未来部署。您可以使用 Hugging Face 的 push_to_hub 进行在线存储,也可以使用 save_pretrained 进行本地保存。
但是,此过程仅专门保存 LoRA 适配器,而不是完整的合并模型。这是因为,在使用 LoRA 时,只训练适配器权重,而不是整个模型。因此,在保存模型时,只存储适配器权重,而不保存完整模型。
# Local saving
model.save_pretrained("<lora_model_name>")
tokenizer.save_pretrained("<lora_model_name>")

# Online saving
model.push_to_hub("<hf_username/lora_model_name>", token = hf_token)
tokenizer.push_to_hub("<hf_username/lora_model_name>", token = hf_token)
要将 LoRA 适配器与原始基础模型合并并以 16 位精度保存模型,以优化 vLLM 的性能,你可以使用 merged_16bit 选项。这允许你将微调后的模型保存为 float16。
# Merge to 16bit
model.save_pretrained_merged("<model_name>", tokenizer, save_method = "merged_16bit",)
model.push_to_hub_merged("<hf_username/model_name>", tokenizer, save_method = "merged_16bit", token = hf_token)
9、模型评估
LoRA 微调过程完成后,我们现在将通过从数据集中加载示例图像及其对应的数学问题陈述(训练期间未使用)来测试模型的性能,以评估模型如何解释和响应它。
from unsloth import FastVisionModel

model, tokenizer = FastVisionModel.from_pretrained(
    model_name = "<lora_model_name>",   # Trained model either locally or from huggingface
    load_in_4bit = False,
)
FastVisionModel.for_inference(model)         # Enable for inference!
image = dataset[-1]["images"][0]
instruction = dataset[-1]["texts"][0]["user"]
messages = [
{
"role": "user",
"content": [
{
"type": "image",
},
{
"type": "text",
"text": instruction
},
]
}
]
input_text = tokenizer.apply_chat_template(messages, add_generation_prompt = True)
inputs = tokenizer(
image,
input_text,
add_special_tokens = False,
return_tensors = "pt",
).to("cuda")text_streamer = TextStreamer(tokenizer, skip_prompt = True)
_ = model.generate(**inputs, streamer = text_streamer, max_new_tokens = 1024,
use_cache = True, temperature = 1.5, min_p = 0.1)
仅需约 3k 个样本进行微调,你就会注意到显着的改进。该模型不仅可以正确解释形状,还可以展示准确的数学和几何推理,产生简洁而精确的答案而不会产生任何幻觉。
10、结束语
多模态/视觉 AI 正在通过使模型能够无缝处理视觉和文本数据来改变行业。使用 Unsloth 等工具可以更简单、更高效地针对特定应用对这些模型进行微调,这可以减少训练时间和内存使用量,而 LoRA 可以实现参数高效的微调。同时与 Weights & Biases 的集成可以帮助您有效地跟踪和分析实验。这些工具共同使研究人员和企业能够充分发挥多模态 AI 的潜力,以实现实际且有影响力的用例。
原文链接:Fine-Tuning Vision-Language Models using LoRA
汇智网翻译整理,转载请标明出处
